Looking for a Neapolitan pizza recipe? Inspired by the best pizza in Naples Italy, here’s a recipe for simple Neapolitan style pizza you can make at home.

When you’ve had the best pizza in Naples Italy, it’s hard to go back. That’s what happened to Alex and me. You know in The Matrix when Neo is given the choice between the blue and red pill, basically choosing between blissful ignorance or truth? Well, once you’ve had pizza in Naples, it’s that kind of moment. Eating pizza in Naples, where pizza was invented, is like choosing the red pill. Once you know what true Neapolitan pizza is, you’ll never go back! And then you’ll spend the rest of your life trying to recreate it at home. Keep reading for all our tips and tricks to the best homemade Neapolitan pizza.
What is Neapolitan pizza?So what is Neapolitan pizza? Essentially, Neapolitan pizza is pizza made in the style that originated in Naples, Italy. Like any famous dish, there are all sorts of variations on “authentic” Neapolitan pizza. After eating some of what is considered the best pizza in Naples Italy, we’ve found the following are characteristics of Neapolitan style pizzas:
Relatively plain flavors: At the best Neapolitan pizza restaurant we’ve been to, Da Michele, they served two flavors: Margarita and Marinara. Margarita is tomatoes, mozzarella and basil, and Marinara is just tomatoes and garlic. Soft, thin crust, cooked in a very hot oven: Most Neapolitan pizzas are baked in a wood fired pizza oven that’s around 800 to 1000 degrees Fahrenheit. The crust is typically blackened by the fire, with puffed edges but very thin towards the middle. Simple tomatoes: The crust on Neapolitan pizzas is typically spread simply with tomatoes, usually San Marzano variety. For our version of Neapolitan pizza we’ve used a simple sauce that mimics the flavors we had in Naples. Mozzarella: The cheese in Italy is amazing. Usually Neapolitan pizza has fresh mozzarella. How to make Neapolitan pizza dough?
The essential part of Neapolitan pizza is the pizza dough. Alex and I have been working on our recipe for 10 years. We’ve even learned a few things from some of the premiere pizza restaurant chefs in America to hone our dough recipe, who have studied the pizza in Naples!. Our best pizza dough recipe is in our cookbook Pretty Simple Cooking. This recipe calls for fermenting the dough: basically keeping it for 3 days in the refrigerator before using it. Fermenting the dough brings a nutty, complex flavor to the dough. We’d recommend placing your pizza dough in a sealed container and refrigerating it for up to 3 days if you think ahead enough! If you don’t have our cookbook, you can use these pizza dough recipes;
Food Processor Pizza DoughStand Mixer Pizza DoughOur other tip for great pizza dough is to use great flour! The flour we use is called Tipo 00 flour; it’s what Neapolitan pizza restaurants use. It makes for a beautiful, supple and fluffy dough. If you’re a pizza nerd, make sure to try using Tipo 00 flour.
Do I need Neapolitan pizza oven?Wouldn’t it be nice if every human could own a Neapolitan pizza oven? We wish! No, you don’t need a Neapolitan pizza oven for this recipe: you can cook it in a very hot oven. However, if you want the beautiful black marks on your crust like in these photos, you’ll need a pizza oven. Why buy a pizza oven? A pizza oven can get much hotter than a regular oven. Your standard oven can get only to 550F, but a pizza oven can get up to almost 1000F!
Until recently, we did not own a pizza oven. But we have recently discovered an amazing pizza oven called the Ooni. The Ooni is small, transportable, and heats up to 1000 degrees Fahretheit in just 10 minutes! It’s powered by wood pellets. The Ooni takes a bit of practice, but it’s revolutionized our homemade pizza. Here’s the Ooni pizza oven that we use!

As mentioned above, most Neapolitan pizza recipes use straight tomatoes right on the dough. The San Marzano variety of tomato is a type of Italian tomato that is most often used on Neapolitan pizza. You can find canned San Marzano tomatoes in many grocery stores in the United States these days! Previously, Alex and I used San Marzanos right out of the can on our pizzas. However, we recently discovered a trick for making a tomato sauce that has even more of the savory goodness that we remember from our Neapolitan pizza. This Homemade Easy Pizza Sauce uses just 5 ingredients to make a truly standout pizza sauce that reminds us of the best pizza in Naples Italy.
Does Neapolitan pizza have basil?Like any famous recipe, there are lots of opinions and ways to make an authentic Neapolitan pizza recipe. When we had Naples pizza a few years ago, our pizza had one leaf of fresh basil on it. ONE LEAF! Somehow, that one leaf brought in just the right back end basil flavor. Because the Neapolitan pizza oven was incredibly hot (around 1000 degrees F), the basil was still a dark green after baking. However, we’ve found that if you’re baking pizza in a standard oven, since it only gets to 550F, you’ll have to cook it for about 7 minutes. In that time, fresh basil turns fully black. Basil isn’t required for a Neapolitan pizza recipe, but if you want to use it and you’re using a standard oven, make sure to add it after baking.

Here’s a photo from when we ate the best pizza in Naples Italy at Da Michele. It goes down as our favorite pizza experience EVER. We even included this photo in the pizza section in our cookbook!
How to avoid watery pizza made with fresh mozzarella cheese?Have you ever tried placing fresh mozzarella on a pizza and ended up with a watery mess? Mozzarella cheese has a lot of moisture in it. If you’re using fresh mozzarella cheese for this recipe, we recommend slicing it into chunks and then letting it sit on a towel for about 15 minutes, then blotting away extra moisture. Doing this removes extra moisture so that the resulting pizza won’t be overly wet.
This recipe is…This Neapolitan Pizza Recipe is vegetarian, refined sugar free, and naturally sweet.

 (1 votes, average: 5.00 out of 1)
Looking for a Neapolitan pizza recipe? Inspired by the best pizza in Naples Italy, here’s a recipe for simple Neapolitan style pizza you can make at home.
Tag @acouplecooks on Instagram and hashtag it #acouplecooks
A Couple Cooks - Recipes for Healthy & Whole Living

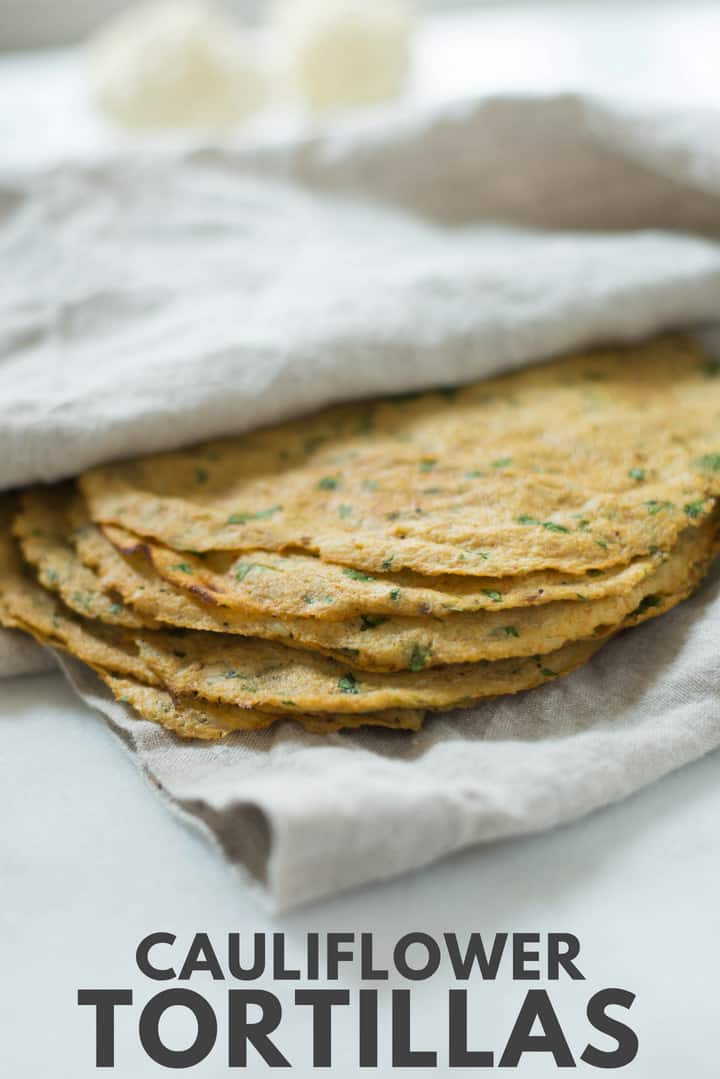
Learn how to make these low carb, high fiber Cauliflower Tortillas. These healthy tortillas are so awesome and the perfect grain-free tortilla substitute! BONUS: Just 42 calories each!
I love to make healthier, clean-eating approved versions of my favorite foods. One of the cuisines I absolutely love is Mexican food.
I mean, enchiladas, tacos, burritos, quesadillas…
They’re just way too good to pass up on. Problem with all those things I love is: the tortilla.
Yep, the pillowy, carby, lard-filled, sheet of complete and utter amazingness. Right? A good tortilla is the best.
So I knew that my happy healthy life would requires Mexican food SO I had to find a way to make a healthy tortilla option that made me happy. Because what is the point of eating well and taking care of your body if you’re not happy?
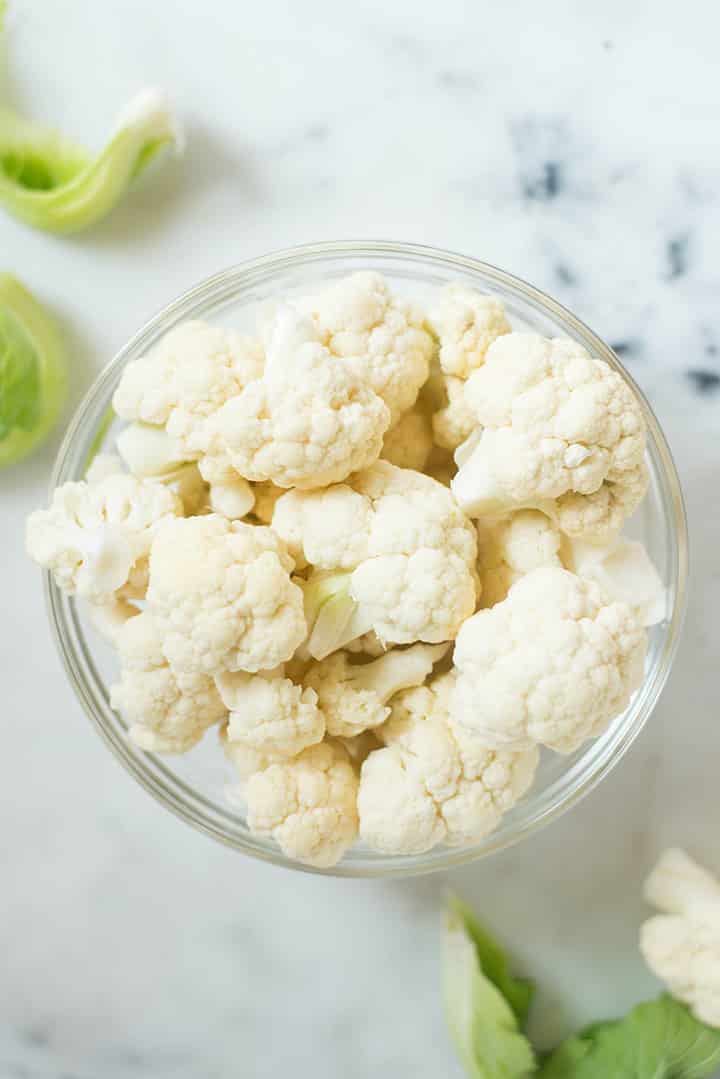
So, I started experimenting with making different kinds of healthy tortillas that I could use in all my favorite recipes. In the past, I’ve made tortillas out of spinach or sweet potato or corn, but I wanted to try out another high fiber veggie: Cauliflower.
If you’ve ever made cauliflower rice, you know there are a few steps involved. Also, if you’ve ever made cauliflower rice, you’ve made cauliflower tortillas part of the way. Congrats.
Ok, so here’s the step-by-step breakdown of how to make Cauliflower Tortillas:
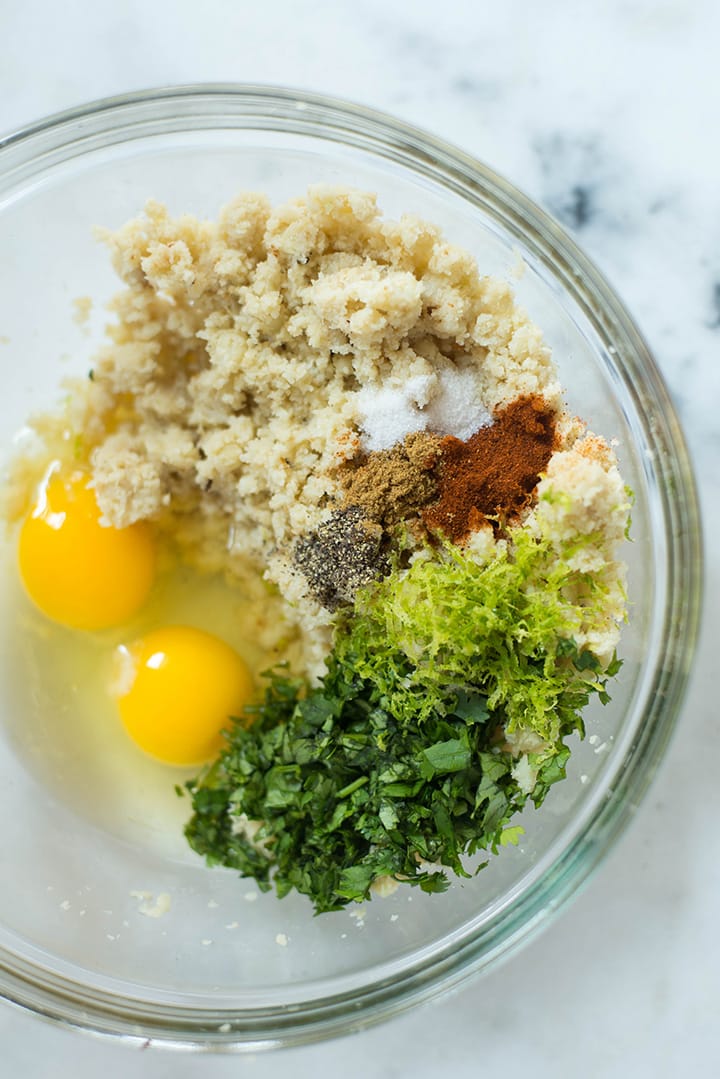
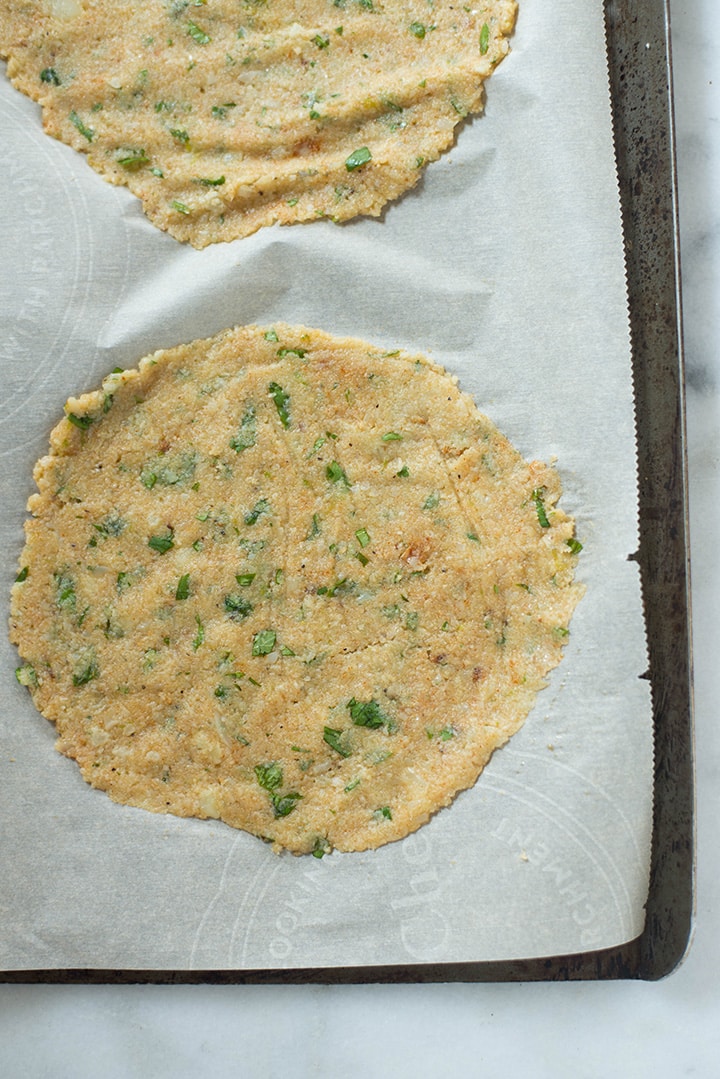
Preheat your oven to 400 degrees F and line a rimmed baking sheet with parchment paper. Process a cauliflower that’s been broken into florets to form a texture similar to rice. (You can also use a cheese grater). Lay out the “rice” evenly on the rimmed baking sheet, and place into the oven to roast for 20-25 minutes, tossing halfway through. Place the cooled, cooked cauliflower rice into a thin clean dish towel or cheesecloth and squeeze out as much excess liquid as you can. Transfer the drained cauliflower to a medium mixing bowl, and then add eggs, chopped cilantro, fresh lime zest, paprika, cumin, sea salt, and pepper. Stir to combine. Divide into 8 portions and lay out evenly on the baking sheet. Using a clean sheet of parchment paper, press down on each ball and carefully spread out to form 8 6-inch tortilla-sized circles. Bake for 5-6 more minutes, flipping carefully, and then baking for 2-3 more minutes, until they begin to curl upwards.Follow these steps and you’ll have delicious, simple, and full of goodness cauliflower tortillas in no time!


Cauliflower Tortillas are a perfect substitute for regular tortillas in your wraps and tacos. They are grain-free, gluten-free and low carb. They are also nut-free and paleo.
Depending on the size of the tortilla, Cauliflower Tortillas usually contain just 42 calories each and about 3 grams of carbohydrates and 2 grams of protein. Just thinking about it makes me love them even more!
HOW LONG DOES IT TAKE TO MAKE CAULIFLOWER TORTILLAS?Thinking of making some Cauliflower Tortillas for next week’s #TacoTuesday? In that case, it might come in handy that making Cauliflower Tortillas from scratch will take you about 40 minutes, from start to tasty finish. yOu can speed up the process significantly if you already have riced cauliflower or you don’t have to process the cauliflower.
Either way, there is definitely down time while you’re waiting for the cauliflower to cook so you can work on other things, like what taco fillings you’re gonna add. I’ve been making homemade tortillas for a while now, but if it’s your first time, just take it easy and don’t rush. You’ll be a pro in no time!

To make Cauliflower Tortillas you will need one large head of cauliflower. Of course, if you want to make extra and save them in the fridge for later, you can double the ingredients and make more.
Don’t want to spend the time breaking the cauliflower into florets and then processing it into rice? No problem – you can pretty easily find riced cauliflower in more grocery store frozen veggie aisles nowadays. I personally prefer using fresh cauliflower and making it myself — I always just pop my cauliflower florets in the food processor and my grated cauliflower is ready in no time. The choice is yours.
Speaking of buying cauliflower, a questionI often get asked is, “Is it best to use fresh or frozen cauliflower to make cauliflower tortillas and cauliflower rice?”
For Cauliflower Tortillas, you can use either fresh or frozen cauliflower. I usually use fresh cauliflower to make the tortillas, but when cauliflower is not in season or you happen to have a bag of frozen cauliflower rice in the freezer, feel free to use it to make Cauliflower Tortillas. The advantage of using fresh cauliflower is that it isn’t quite as liquidy as frozen cauliflower so you don’t need to squeeze out quite as much liquid once it’s time for that step.

I love simple recipes that don’t require any ingredients that are hard to find (or pronounce!). Clean, whole ingredients make the best recipes and it’s the same with these Cauliflower Tortillas. Here’ are the ingredients you’ll need:
cauliflower eggs fresh cilantro lime zest paprika cumin sea salt ground black pepperUse your favorite spice blend and seasonings to add some extra flavor to your Cauliflower Tortillas. If you don’t like cilantro, you can leave it out or replace it with sliced green onions or parsley.

These Cauliflower Tortillas are so good, I often just eat them on their own. Ok, only when I’m too lazy to make a filling or when I just want a super quick, healthy snack.
So, while you’re at it go ahead and make extra. Store them in air-tight containers and keep in the fridge for up to 5 days. They last great and are super easy to store.
The fact that they taste great even after a few days, makes them perfect for meal prep. Just make a batch and keep in the fridge until ready to eat. If you’re making your filling ahead of time, too make sure you store it separately. They are great warmed up in the microwave for about 30 seconds or quickly on a hot griddle.

I store my Cauliflower Tortillas in a large sealable plastic bag in the fridge. Believe it or not, there’s no need to place parchment paper in between them to soak up excess moisture – they stay perfect without it. Because they contain egg and veggies, we definitely want to store in the fridge versus on the counter or in a pantry.
I try to store them as flat as possible since they are somewhat delicate and can break if bent too far.
Good news, my vegan friends! You can easily make Cauliflower Tortillas dairy-free and vegan. To do that, simply replace the eggs with ground chia or flax seeds to make your egg substitute. Tip: This also comes in handy when you run out of eggs.
Here’s how to make your flax egg for an egg substitute for cauliflower tortillas:
Combine one tablespoon of flaxseed meal (AKA ground flaxseed) with 3 tablespoons of water in a small bowl. Stir well. Let sit for 5 minutes to thicken. Use the mixture to substitute 1 egg in your recipe.This makes one egg substitute so you’d need to use 2 tablespoons of flaxseed meal and 6 tablespoons of water for this tortilla recipe.

As much as I love my Cauliflower Tortillas, I do need to change it up a bit. Plus, I love to experiment with different flavors. That’s why I’m sharing with you, not one, not two, but three of my favorite Healthy Tortilla recipes. Let me know which one Is your favorite!
SPINACH TORTILLAS
You will need only four ingredients to make these easy homemade Spinach Tortillas. They are vegan and a totally delicious healthy substitute for refined flour tortillas. Also, you don’t need a tortilla press to make them, just your plain old rolling pin! Make sure you’re making extra because not only are they delicious but they keep in the fridge for 3-4 days! GET THIS RECIPE!
SWEET POTATO TORTILLAS
Learn how to make Sweet Potato Tortillas with just 3 ingredients! These homemade tortillas are great for tacos, wraps, enchiladas and quesadillas, but also tasty enough to be enjoyed by themselves. They are light but dense and so flavorful. What you’ve got here is by far one of my favorite clean eating tortilla recipes! GET THE RECIPE!
CORN TORTILLAS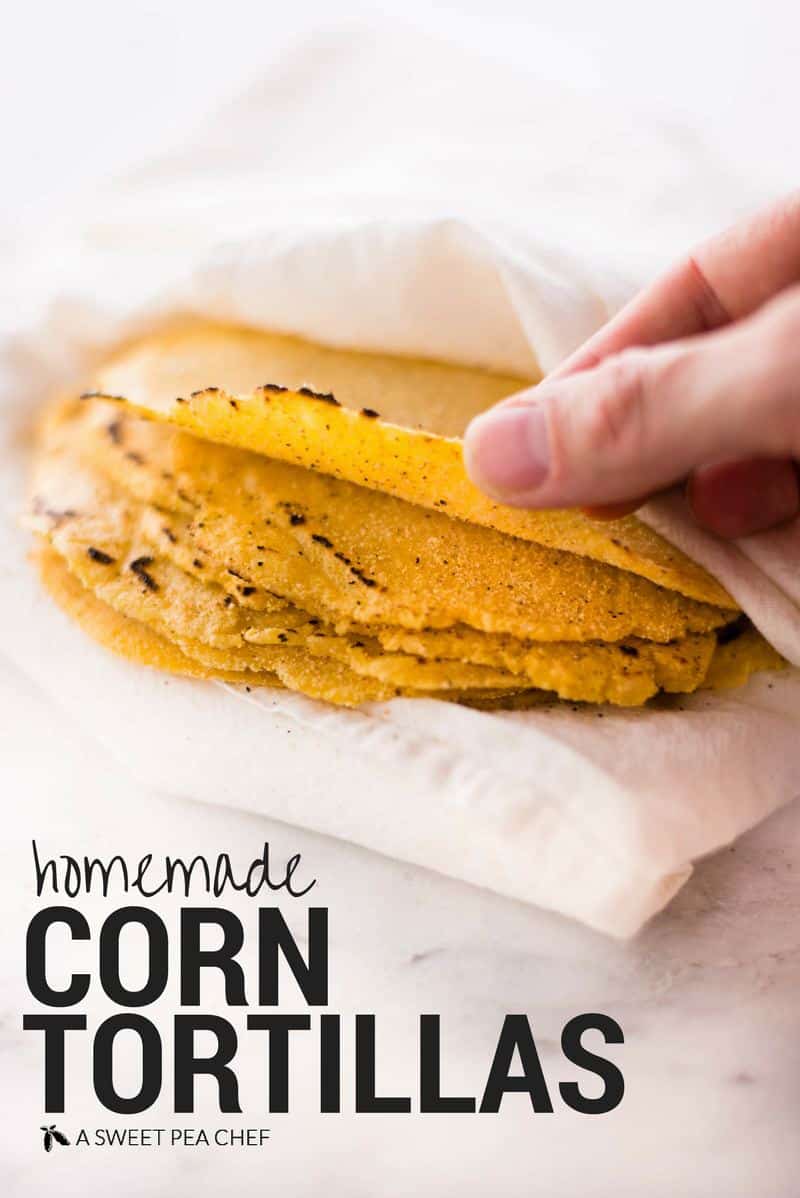
These Homemade Corn Tortillas are clean, vegan, gluten-free and so easy to make. You will need just 4 ingredients. I promise that once you learn how to make Homemade Corn Tortillas, you’ll never wonder if Corn Tortillas are healthy again! Enjoy all the flavors you love, but without all the processed stuff! GET THE RECIPE!

Learn how to make these low carb, high fiber Cauliflower Tortillas. These healthy tortillas are so awesome and the perfect grain-free tortilla substitute!
Using a food processor, we’re going to process a cauliflower that’s been broken into florets. We’re looking for it to form a texture similar to rice. Don’t overdue it and make it a mash.
If you don’t have a food processor, you could also use a simple cheese grater to grate the cauliflower into rice. Lay out the “rice” evenly on the rimmed baking sheet, and place into the oven. Roast the cauliflower for 20-25 minutes, tossing halfway through, until the cauliflower is tender and starting to brown around the edges of the pan. Remove from oven and allow to cool. Once the cauliflower rice is cool enough to handle, place it into a thin clean dish towel or cheesecloth and squeeze out as much excess liquid as you can. This will be very helpful when it’s time to cook the tortillas because they won’t be super liquidy. You can just discard the liquid once you’ve gotten as much out as you can. Transfer the drained cauliflower to a medium mixing bowl, and then add eggs, chopped cilantro, fresh lime zest, paprika, cumin, sea salt, and pepper. Stir to combine. Separate the mixture into 8 equal portions. Using two baking sheets lined with parchment paper, divide the 8 portions into 4 balls each and lay out evenly on the baking sheet. Using a clean sheet of parchment paper, press down on each ball and carefully spread out to form 8 6-inch tortilla-sized circles. Then, place in the oven and bake for 5-6 minutes. They’re ready to flip when you can pretty easily pull them up from the parchment paper. Then flip them carefully over, and cook for an additional 2-3 minutes, until completely set. You’ll know they’re done when they begin to curl upwards. Stack the cooked tortillas and keep them covered with a clean dish towel until you’re ready to eat. The towel will hold in the steam from the cooked tortillas as they cool down, keeping them soft and flexible.You can also place them in a ziplock bag once they’ve completely cooled and store them in the fridge for unto 4-5 days.
You can also place them in a ziplock bag once they’ve completely cooled and store them in the fridge for unto 4 days.
This post contains affiliate links for products I use often and highly recommend.
The post Cauliflower Tortillas (Just 42 Calories!) appeared first on A Sweet Pea Chef.

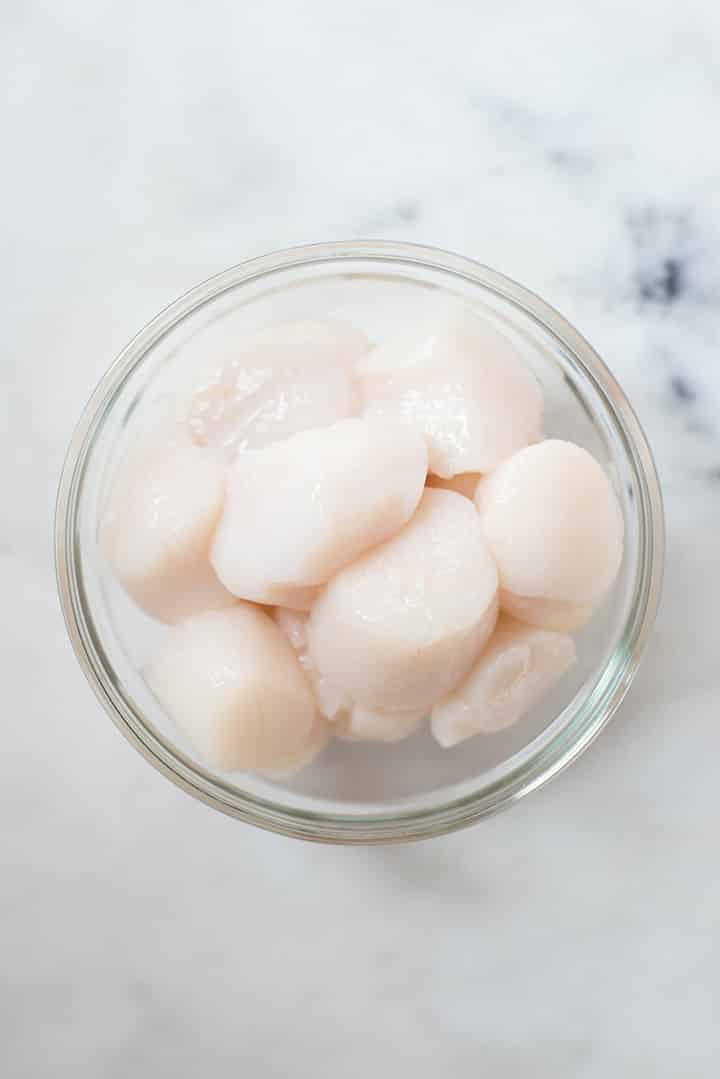
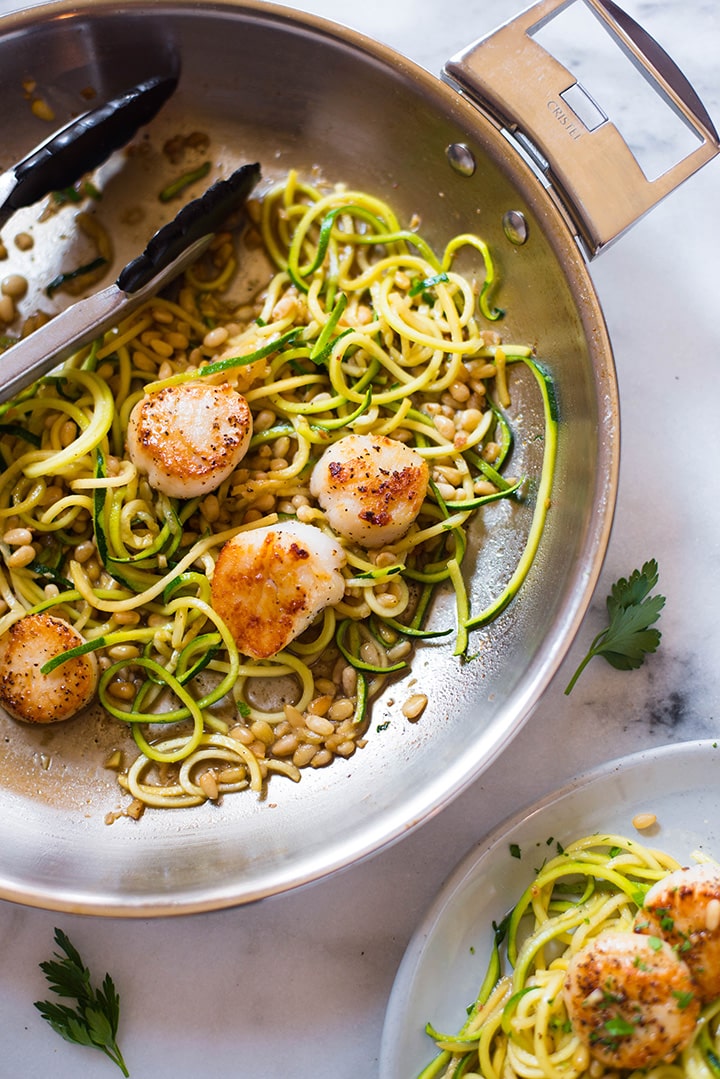
Who doesn’t love a quick, healthy, and fancy meal, am I right? These Easy Pan-Seared Scallops are seared with very little oil and served over a great low carb pasta alternative. BONUS: It’s ready in less than 20 minutes! So quick, simple, and delicious! This post is sponsored by Cristel USA.

Like most seafood, scallops are relatively low in calories. They are also low in fat and high in protein. In fact, one serving of scallops provides you with 20g of protein! Isn’t that awesome?
So, why is it especially awesome that these scallops are in a healthy recipe IF scallops, by themselves, are already healthy, you ask?
Well, the issue is not the scallops, it’s with the preparation.
Most people don’t know what to serve with pan seared scallops so they go for the classic scallops and linguine. I know that’s what I did in the past.
Pan-seared scallops with pasta seems like a good idea…unless you struggle with weight or you wan’t to eat a clean diet, free of refined flours.
Sometimes, it can feel hard to eat healthy when you love to cook and when you love to eat. But this is far from the truth.
If you adjust your recipes just a little bit and you change the way you cook, you will start to notice big differences.
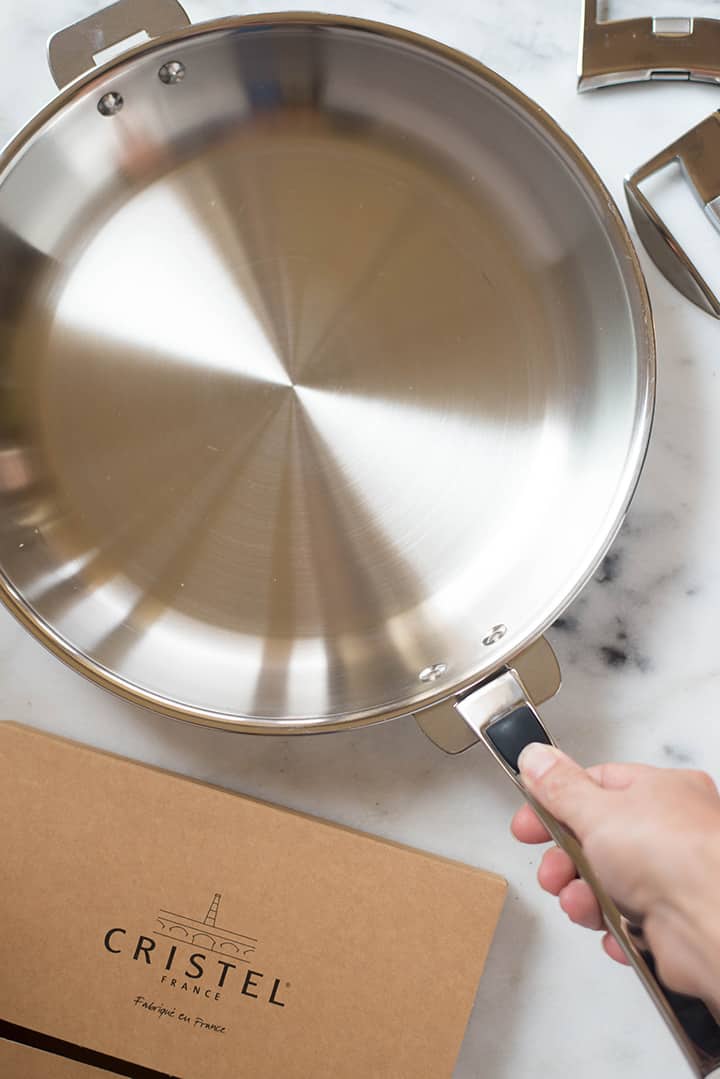
My New Cristel 11-Inch Casteline Frying PanFriends, I have to tell you about my beautiful new Cristel Frying Pan. I love it so much. It’s almost too gorgeous to cook with…almost!
With this pan, you can cook with little to no oil or fat. That means more amazing flavors with less added fats. Big bonus!
How is this possible?
Basically Cristel created the perfect pan — one that is made of high quality stainless steel from France and that has very accurate heat control.
Yes, it is important to mention France here – you know how amazing French cuisine is (and how much butter is usually involved in French cooking) so you have to trust that a cookware manufacturer from France knows how to create the best cookware you can use without fat.
You can cook everything in this pan. Seafood, meat, eggs, potatoes, and veggies (more on that coming soon!). And the Cristel Frying Pan has a removable handle. Which means you can turn the pan into a dish that can be used to finish cooking in the oven.
How amazing is that? Think about all the pan-roasted dishes you can prepare using this pan. And all of them will be low fat and will contain fewer calories than usual.
Now let’s get back to this recipe for pan seared scallops.
Believe it or not, I was very afraid to make pan-seared scallops in the past. I searched around for different recipes and instructions on how to pan-sear scallops which…actually…started to make me worried about doing it “right.” I read I couldn’t use a non-stick pan or it would be a waste of time.
Yelp!
I read, if you don’t do it right, you will overcook the scallops, which will render them completely rubbery and inedible and you will have thrown your money out the window.
Jeez! This sounded scary.
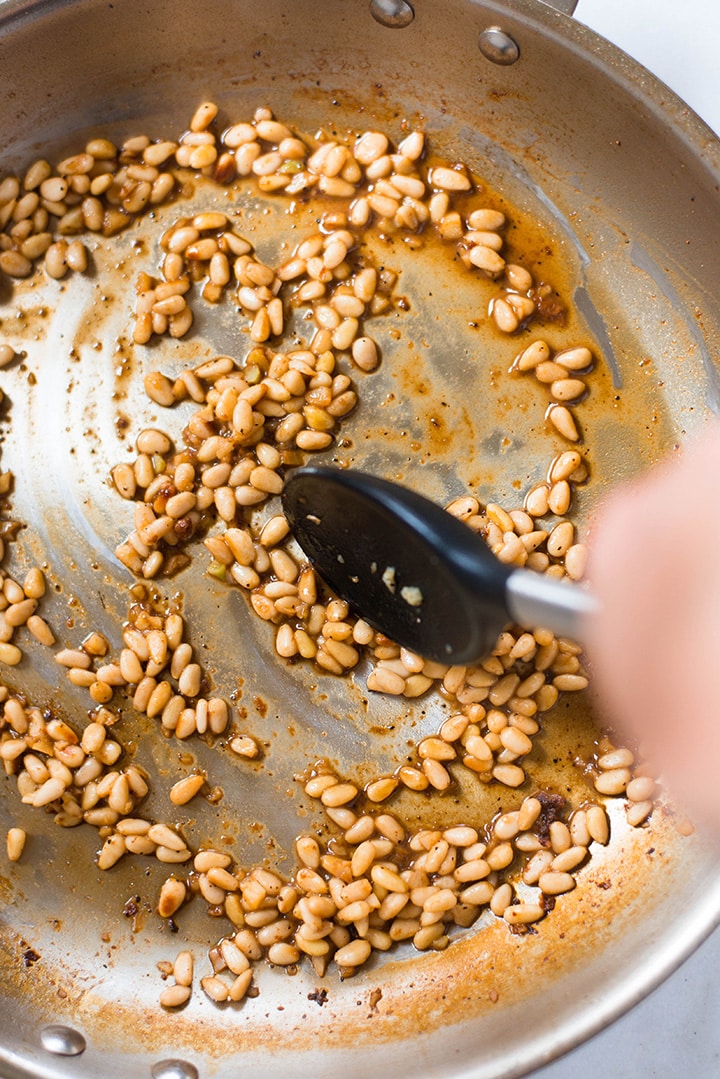
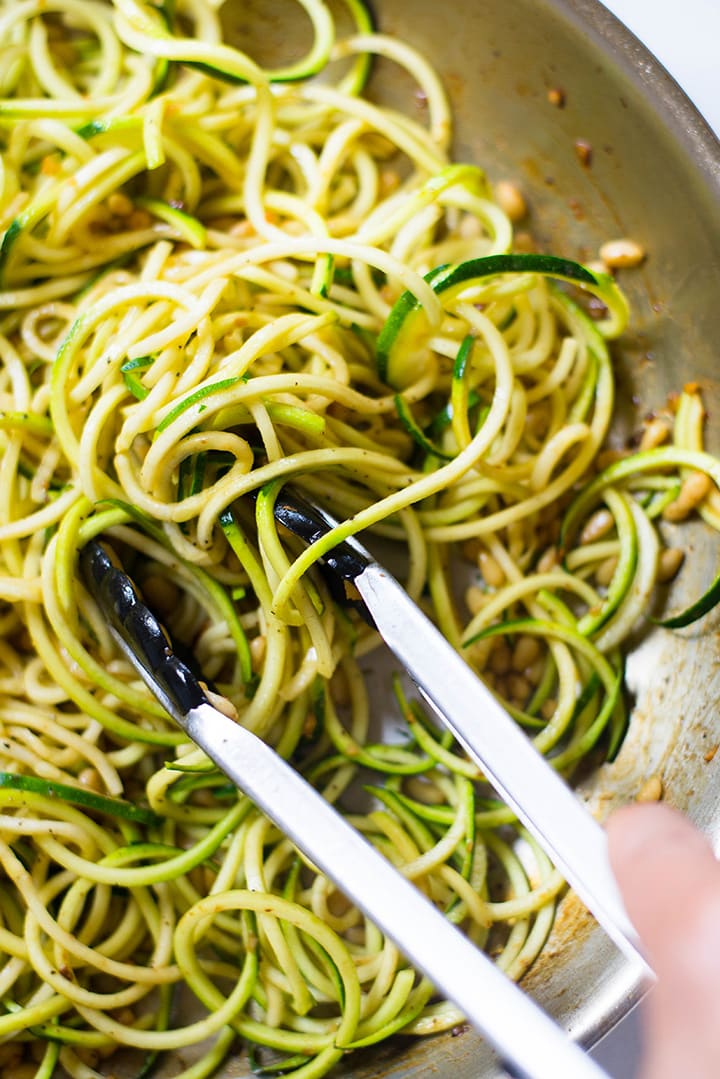
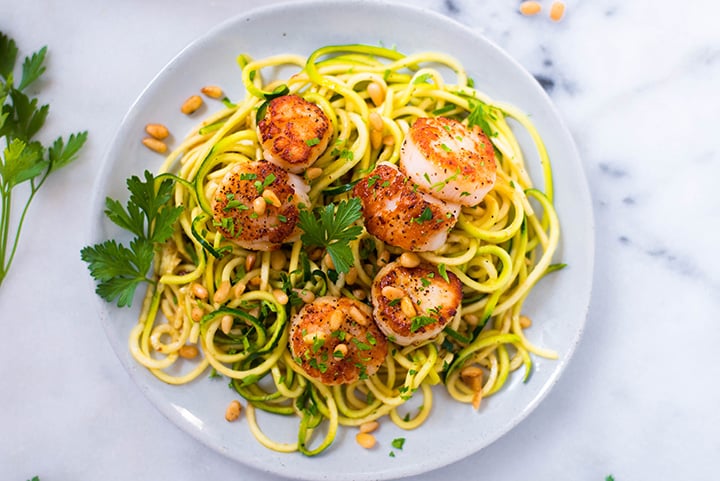
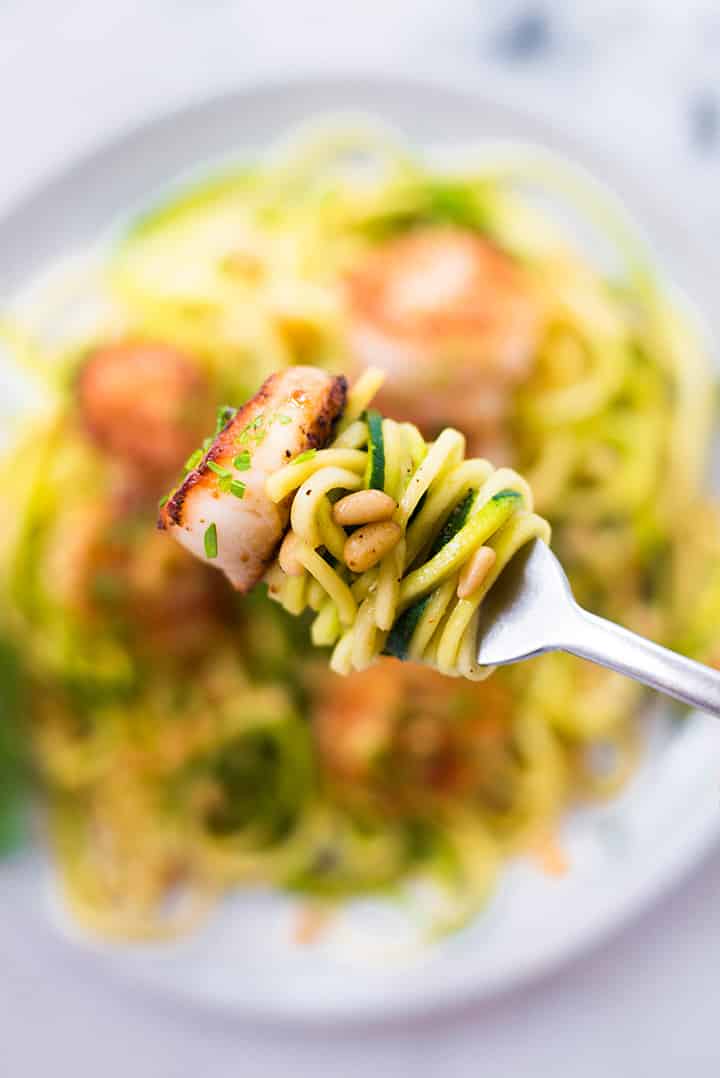
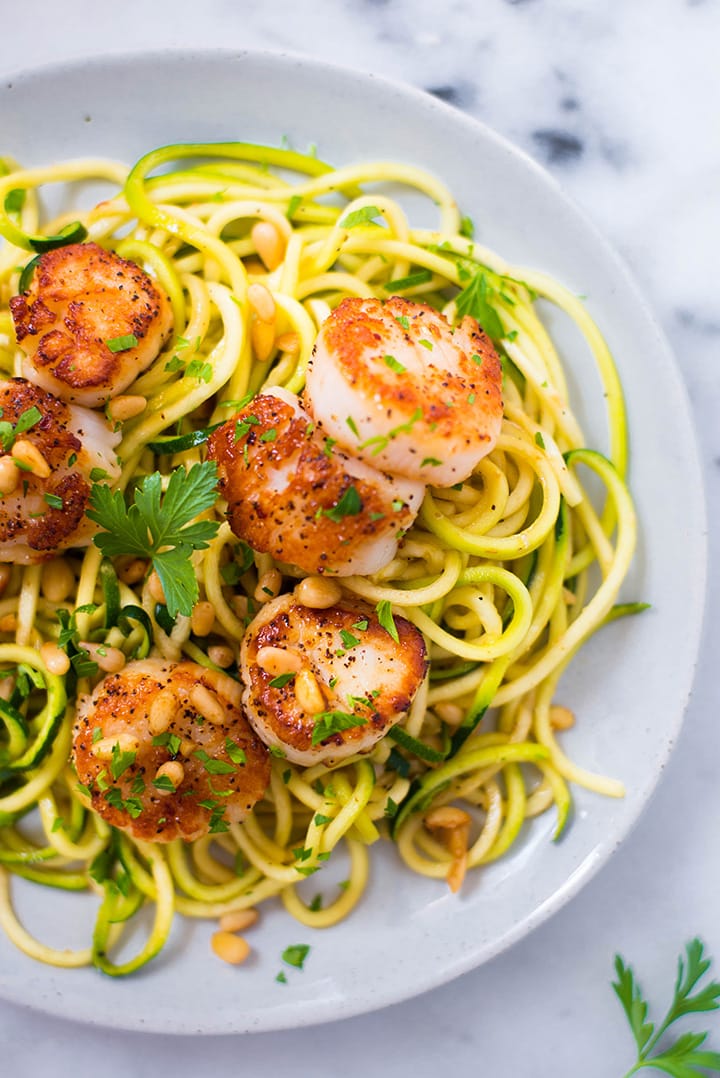
I already mentioned that I used to love scallops with pasta in the past, right? Old habits die hard, am I right? So, for this recipe, I chose zucchini noodles and roasted pine nuts. The pine nuts were actually Dustin’s idea — they were great as they added a nice texture to the zucchini noodles and scallops.
HOW DO YOU MAKE PAN SEARED SCALLOPS?After making pan seared scallops a few times, I have found scallops really aren’t as scary as people like to make them. Just be sure to keep a few things in mind:
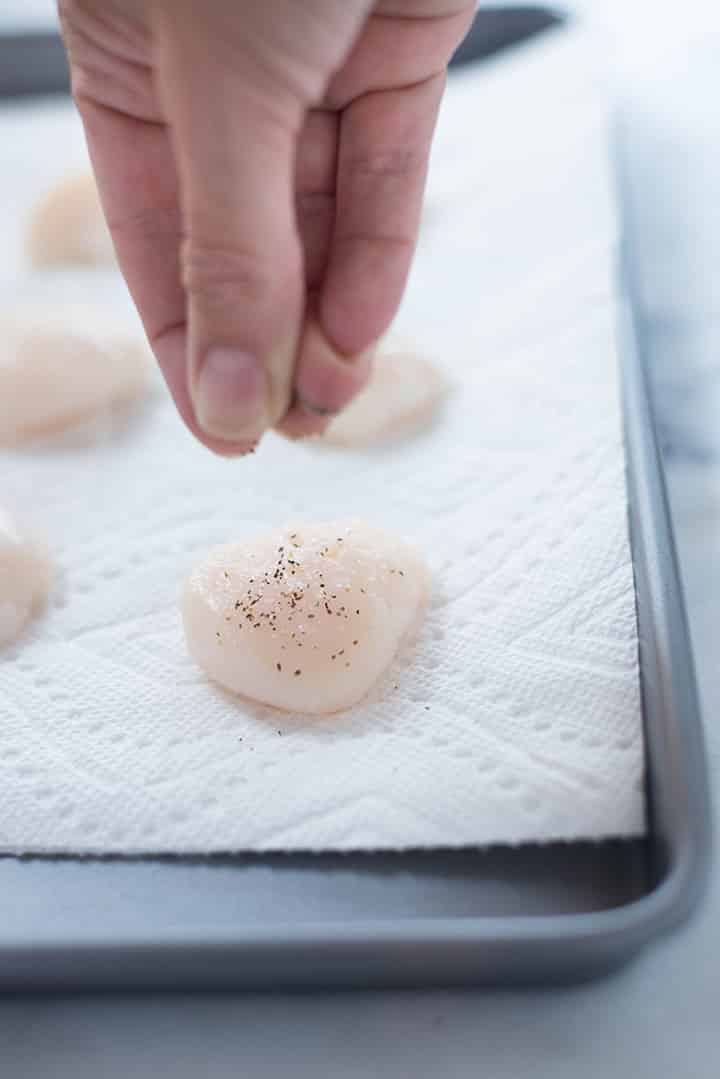
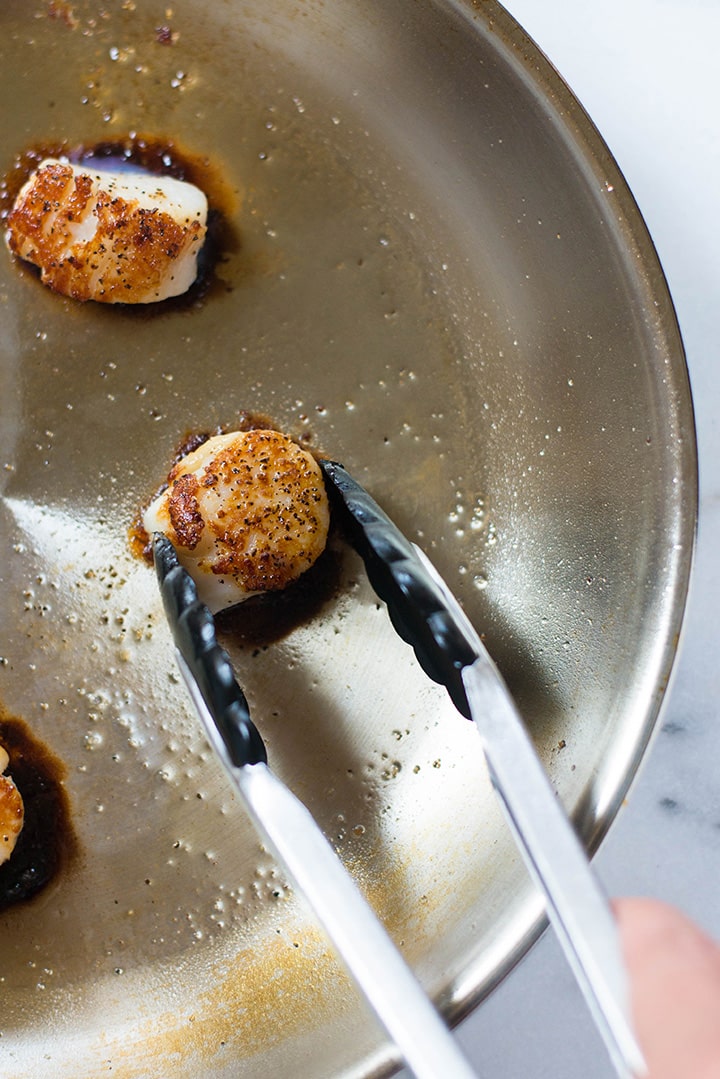
Try to get uniformly-sized and large scallops. This will help when cooking as they will all cook evenly. Make sure the scallops are completely dry (patted dry with a paper towel) before searing as any liquid may cause the sear to become more of a steam. Make sure the pan is nice and hot when it’s time to sear. You can make sure the pan is hot enough by performing the “waterdrop test” where water will form balls that will roll and dance on the pan when it’s the correct heat, Add just a little bit of oil in the pan. Add the dry scallops to the hot pan and don’t move them. When you can detach the scallop easily from the pan, this means it is cooked and perfectly seared — if it sticks, let it sit longer.Follow these steps to make the best no-fail pan-seared scallops ever! No need to be afraid of making a mistake.
Okay, let’s talk side dishes now. You know what side dish goes well with pan-seared scallops? Spiralized veggies. They make a great low carb pasta alternative, plus add fiber, and nutrients to your meal. Aside from the zucchinis mentioned in the pan seared scallops recipe, you can use:
Sweet PotatoBeet Yellow Squash Carrot Bell Pepper Broccoli Stems Jicama Butternut SquashAnd, if you don’t own a spiralizer, you can use a vegetable peeler or a paring knife.
A regular serving of pan-seared scallops has approximately 110 calories. Since a serving usually includes 4 or 5 big scallops, this is not bad. Not at all bad.
But when you serve pan seared scallops with pasta it’s a whole different story. One serving can go up to 597 calories. That’s a lot. And a lot of carbs. So, instead of serving scallops with linguine, try pan-seared scallops and zucchini noodles. Fewer carbs and only 326 calories per serving! Now, that’s a good pasta!
WHAT IS THE DIFFERENCE BETWEEN PAN-SEARED AND SAUTEED SCALLOPS?Wondering if there is a difference between pan-seared scallops and sautéed scallops? Is there any difference? Why yes, there is.
Pan-searing scallops involves a pan and one or two tablespoons of oil or butter. The scallops are added to the pan after the oil is heated to high over the stove. The whole purpose of the pan searing is to give the scallops a crispy outside crust while maintaining the tender texture inside.
Sautéeing scallops, on the other hand, involves a little oil or butter and high heat. Sautéing can be a great way to quickly cook the scallops, but you do risk overcooking them if anything else is getting sautéed along with the scallops. Plus, with pan-searing, you get that amazing crust on the outside of the scallops.
Not very long at all! Like for realz. Scallops can easily overcook and become more rubbery than tender. So, how long does it take to cook pan-seared scallops?
The basic answer is that we want to try to cook them for as little time as possible to get the job done. Generally, scallops take no longer than 1 or 2 minutes to cook per side, depending on size. The larger they are, the longer they’ll need to cook, and vice versa.
I’m such a fan of seafood – it’s so fresh, quick to cook, and full of great nutrients and flavor. Here are some of my other favorite healthy seafood recipes for you to try:
15 Minute Healthy Shrimp ScampiThis easy, flavorful, and healthy Shrimp Scampi recipe comes together in just 15 minutes! Plus how to make and store spiralized zucchini noodles.
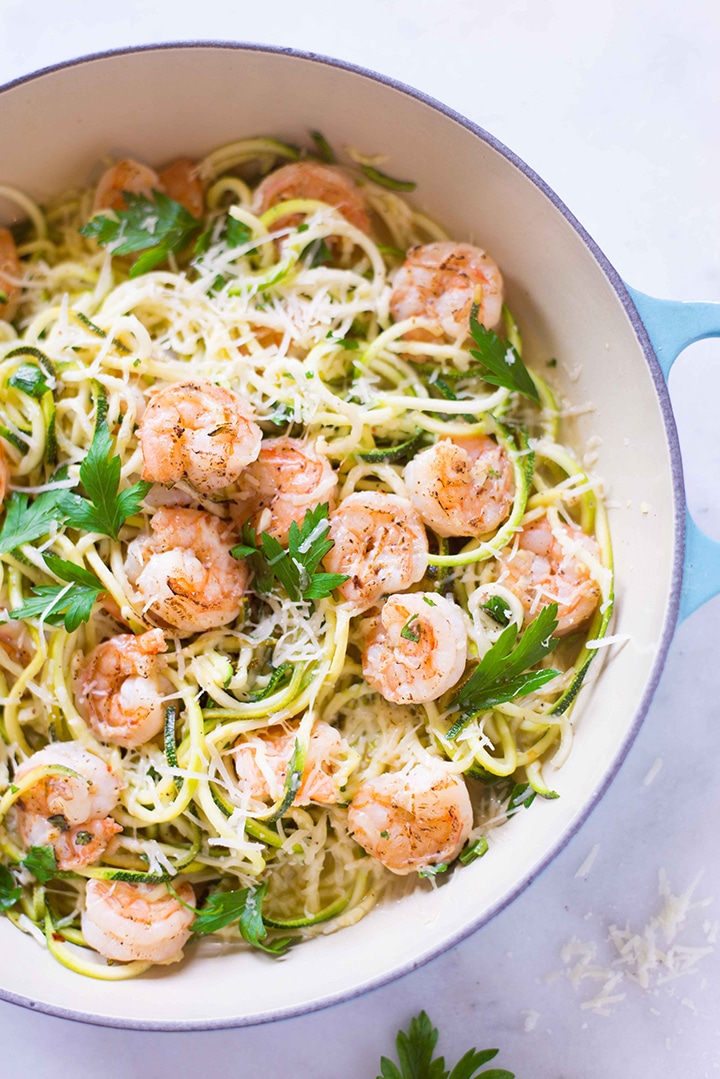
The majority of shrimp scampi out there is not very healthy because the shrimp is sautéed in a LOT of butter. And then it’s accompanied by — you guessed it — pasta. That just adds tons of carb to a lot of fat.
You can make healthy shrimp scampi by replacing the butter with olive oil and using less of it. And by replacing pasta with zucchini noodles. Get the recipe!
Pan Fried SalmonThis Pan Fried Salmon is one of my favorite easy dinner recipes. Follow my easy steps for how to cook salmon perfectly every time.
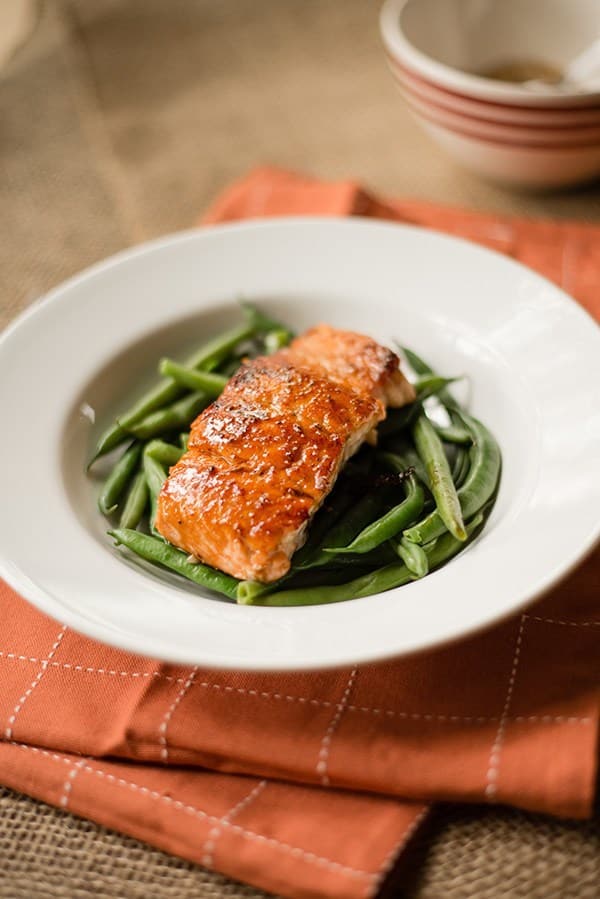
This Pan-Fried Salmon recipe makes delicious salmon. And it’s a very easy recipe, perfect for weeknight dinners. Get the recipe!
Baked Sea Bass And Zucchini Sheet Pan RecipeOne of my absolute FAVORITE things in the world is easy, healthy, quick, and delicious dinners with little to no clean up required, and that’s what you get with this Baked Sea Bass And Zucchini Sheet Pan Recipe.
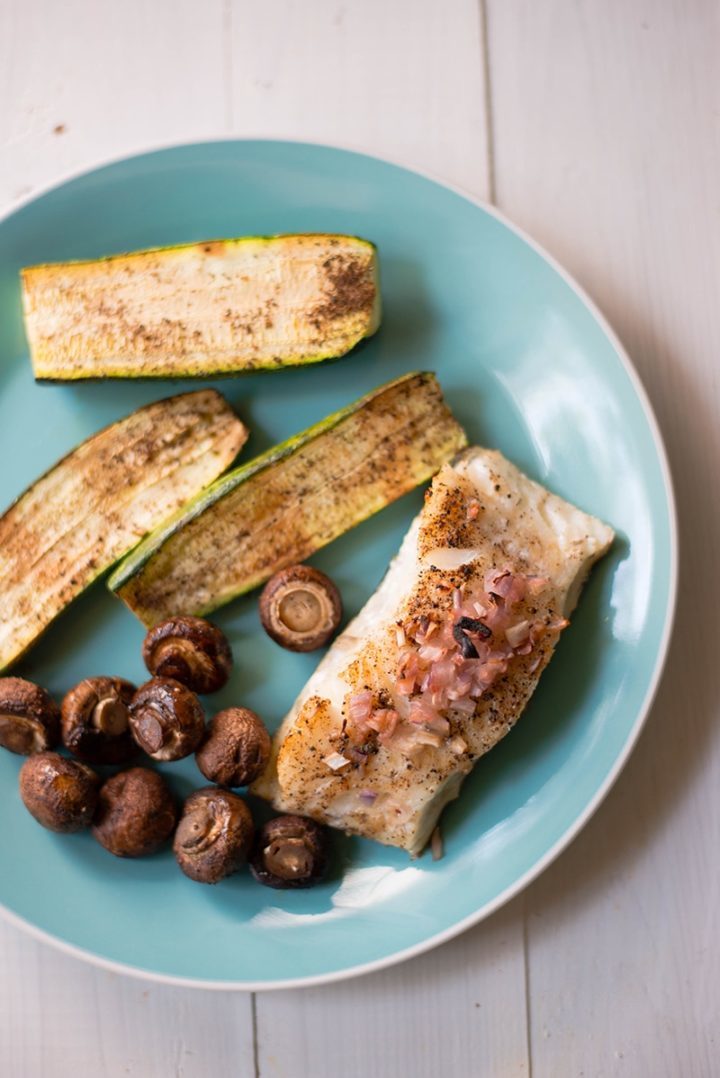
Just do a teencie weencie bit work ahead of time and let the oven do the rest. And it doesn’t disappoint! Get the recipe!
HOW TO TELL IF PAN SEARED SCALLOPS ARE DONERemember what I said earlier – that scallops can be easily overcooked if you don’t follow the tips I shared? So try to be careful — they’re easier than you might think to cook perfectly, but can also be overcooked which is kind of a bummer. So, how do you tell if the scallops are done and fully cooked?
Well, the scallops are cooked when…
the flesh is opaque the center is slightly translucent they should be firm to touch the crust should be golden brown.Also, they will continue to cook once off the heat so remove them from the pan quickly.
I’d imagine most chefs would tell you there is no point in making pan seared scallops ahead of time. But, that being said, it is still possible to prepare them ahead of time and then reheat. Will this make them a little less tender? Yes. Will this lessen the crispiness of the golden-brown crust? Also, yes.
Since searing scallops requires only 5 minutes (prep time included!), I’d recommend just waiting till it’s time to cook to sear them quickly BUT yes, you can totally cook them ahead of time and then reheat them, if needed.
When you want to reheat the scallops, you can reheat them in the Cristel Frying Pan. Follow these simple steps to reheat pan-seared scallops:
Heat your pan over medium-high heat. Add just a little bit of olive oil or unsalted grass-fed butter. Add the scallops and cook just about one minute per side to heat though.Reheating them on the stove is preferred because the microwave will likely overcook them.
Cristel has been nice enough to offer up one of their fabulous 11-inch Casteline Frying Pans for PLUS a set of Casteline stainless steel handles (one long and two side handles) FREE to one lucky winner. The total retail value of which is $341.98! This is the same pan I have and that I used to make these pan seared scallops so I know you’re gonna love it.
That means you definitely want to enter this giveaway so you get your hands on this beautiful and useful frying pan for FREE. To enter the giveaway, check out below. We will randomly choose a winner at 11:59 PM on 9/10/2018 and will contact the winner via email. Good luck!
HOW LONG ARE PAN SEARED SCALLOPS GOOD FOR?Fresh scallops can be stored in the fridge for a day or 2. Ideally, you should cook them on the first day to make the best use of fresh seafood. The pan-seared scallops are good for 3 days, if stored properly. Use this easy pan seared scallops recipe to prepare the scallops, and then store them as you would store cooked shrimp – in an airtight container or Ziploc bag placed in the fridge.
You can also store pan seared scallops in the freezer. They will be safe to eat for up to three months if you wrap them in foil or place them in a freezer-safe Ziploc bag.

These easy pan-seared scallops are seared with very little oil and served over spiralized zucchini noodles, a great low carb pasta alternative. So quick, simple, and delicious!
Heat a large skillet (I use a Cristel 11-inch Casteline Frying Pan) over high heat until hot enough to make drops of water dance across the surface.
Add the olive oil and swirl to coat the pan. Dry off the scallops with a cloth and then lightly season each side of the scallops with sea salt and ground black pepper. One at a time, add the scallops to the hot pan. Take care not to overcrowd the scallops and place the scallops in the pan with at least 1-2 inches between them (so they don’t crowd and steam one another). Allow the scallops to cook for three minutes without touching them. After three minutes, the bottom should be browned nicely. Carefully, flip the scallops and cook for 2-3 minutes or until well-browned. Remove from heat and set aside. In the same pan, add the pine nuts and minced garlic and cook for 1 minute, stirring constantly. Once the pine nuts are golden and the garlic is fragrant, add chicken broth and deglaze the pan, scraping off any bits from the bottom of the pan. Add the zucchini noodles to the pan and toss, cooking for just 2-3 minutes, until slightly tender and heated through. Quickly remove from the pan and serve, topped with the pan-seared scallops and garnished with minced parsley.This post is sponsored by Cristel USA.
The post Easy Pan Seared Scallops + A Super Awesome Giveaway! appeared first on A Sweet Pea Chef.

The BEST turkey lasagna EVER. Made with a homemade tomato basil sauce packed with fresh herbs & italian spices, layered with lean ground turkey, mozzarella, creamy ricotta and a touch of parmesan. Perfect for serving crowds, family style dinners, or freezing for later! YO YO YO. Remind me to never start a blog post with [...]
The post The Best Healthy Turkey Lasagna You’ll Ever Eat appeared first on Ambitious Kitchen.
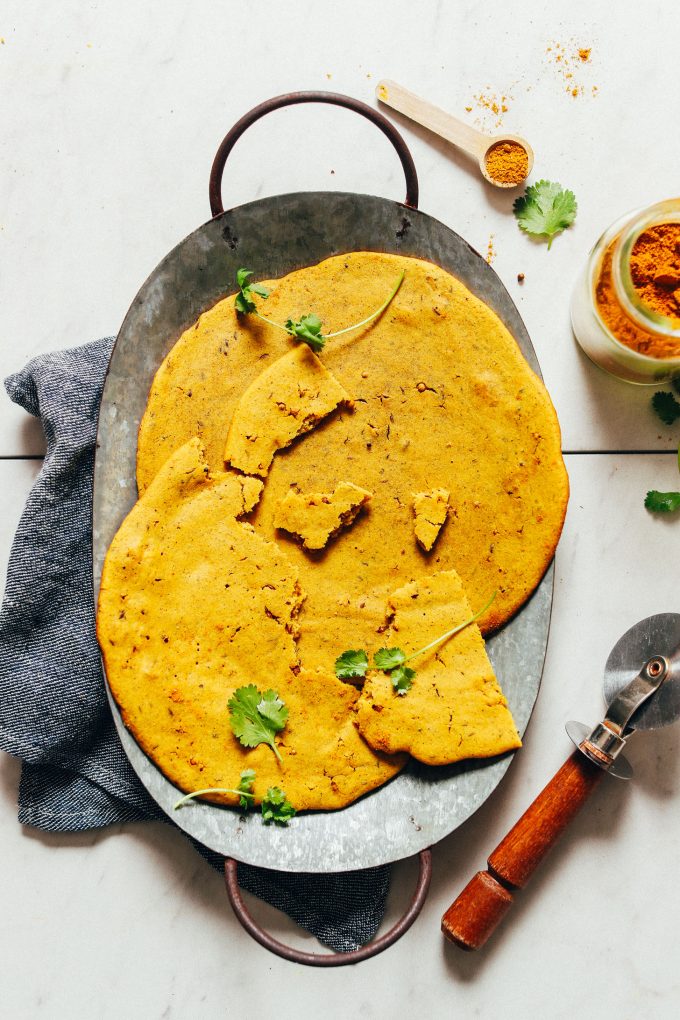
Have you ever tried socca? It’s a new-to-us bread that’s not only vegan and gluten-free, but also grain-free, as it’s made with chickpea flour! And in this Indian-inspired version, we used whole spices to infuse a curry flavor into the bread. Swoon.
How do you enjoy socca? So many ways! This recipe in particular works well anywhere traditional naan would, as well as with dips such as hummus and baba ganoush.
Fluffy Curried Socca (Chickpea Bread) from Minimalist Baker →
from Merah Hati Cintaku https://ift.tt/2Nh64os
via merahhaticintaku.blogspot.my
No comments:
Post a Comment