
By ALAN HENRY from NYT Travel https://ift.tt/2slb6V9
from Merah Hati Cintaku https://ift.tt/2xBekca
via merahhaticintaku.blogspot.my


This post was created in partnership with ALDI. All opinions are our own.
It’s officially SUMMER! I can’t even tell you how excited we are about summer entertaining over here: the smell of the grill, a crisp rosé, and the sound of your neighbor mowing his lawn (right?). Each summer, Alex and I create vegetarian grill recipes to prove that grilling is just as delicious without the meat. This year we’ve teamed up with ALDI to make an easy, healthy summer meal featuring the grill, and it turned out so fantastic we can’t stop eating it! It has not one but two grilled components: grilled veggies AND a grilled romesco sauce. So it should really be called double grilled vegetable pasta, I think. (PS ALDI has a great rosé called Trestoria Rosé we’ve been drinking that’s under $7!)
Alex and I have been shopping at ALDI since we were newly married (gulp!) eleven years ago. Back then, we used to mainly buy pizza sauce and premade crust. How things have changed for us! In the past few years, ALDI has changed too, focusing on offering more healthy, fresh and organic ingredients. ALDI has a mission to provide everyone with high-quality food at affordable prices. WHICH is such a fantastic mission, because Alex and I believe that every person deserves to eat good, healthy, and fresh foods. After I visited their wine supplier operations in Washington wine country last year, it was clear that they are uber passionate about offering the highest quality items and keeping the cost low. All that to say, when you’re hosting family and friends this summer, ALDI is a great place to stock up. And, we’ve noticed our bill is consistently lower than when we shop at any other grocery. Just saying.


So, this grilled vegetable pasta! Alex and I wanted to bring the grill flavor to a vegetarian main dish. Oddly, we’ve never grilled veggies and mixed them into pasta. You’d think we would have thought of it after 8 years of eating mostly vegetarian, but I guess there are always new things to discover! The fun thing about this recipe is that there are two grilled components: veggies for the pasta, and bell peppers for the grilled romesco sauce. Romesco is a roasted pepper and almond sauce that originates from Spain, and usually when we make it we use jarred red peppers. But for this recipe we thought: why not grill the red peppers to create a grilled romesco? It makes a creamy bright red sauce for the lightly smoky and addicting grilled vegetable pasta. Top it with feta crumbles for vegetarian, or leave it off for vegan. Here we used linguine noodles, but you can use penne or other short shapes. We’ll definitely be eating this grilled vegetable pasta all through the summer!
To learn more about ALDI, head here. And let us know, are you an ALDI fan? Do you have them in your area?
This recipe is…This grilled vegetable pasta is vegetarian. For vegan, plant-based, and dairy-free, omit the feta.
For gluten-free, use gluten-free pasta. *ALDI has some great organic, gluten-free options from the liveGfree line, like penne or brown rice quinoa fusilli.


 (1 votes, average: 5.00 out of 5)
You need to be a registered member to rate this. ![]() Loading...
Loading...
Want to up your summer grilling game? Try this grilled vegetable pasta with grilled romesco sauce! It’s a delicious and healthy vegetarian grill recipe that will keep the family coming back for more.
Grill the vegetables: Heat a grill to medium-high heat. Cut off the tops off of the peppers and remove the pith and seeds. Remove the stems from the top and cut the top in half, then quarter the bottoms. Cut the broccoli into bite-sized florets. Cut the onion into thick slices. Coat vegetables lightly with about 1 tablespoon olive oil and a few pinches of kosher salt. Use your hands to rub the olive oil into the veggies so they are lightly coated.
Place a few sheets of foil to cover the entire grill (or use a grill basket). Poke several small holes in the foil. Place the veggies on the foil and grill them, turning occasionally, until tender and lightly charred (about 15 minutes). Remove from the grill and place the vegetables on a baking sheet.
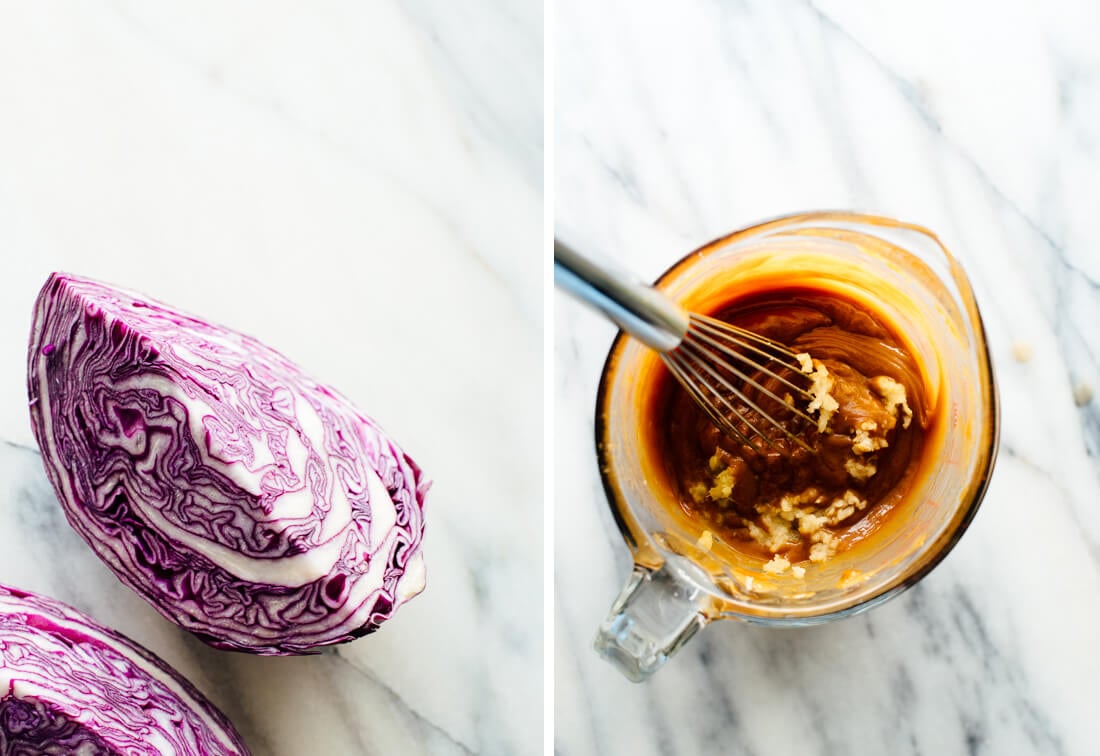
Make the romesco sauce: Peel the garlic. In a blender or food processor, add the garlic, tomatoes (including the can juice), 2 tablespoons olive oil, lemon juice, smoked paprika, red pepper flakes, and kosher salt. When the vegetables are grilled, remove the pepper slices and place them in the blender. Process the sauce until smooth.
Make the pasta: Bring a large pot of salted water to a boil. Boil the pasta until al dente, then drain. Combine with the romesco sauce and grilled broccoli and onions, then taste and add additional salt as desired (we added about 1/2 teaspoon — for the vegan version, you can add more salt than for the vegetarian version, since feta adds salt). Top with feta crumbles and serve.
Tag @acouplecooks on Instagram and hashtag it #acouplecooks
A Couple Cooks - Recipes for Healthy & Whole Living

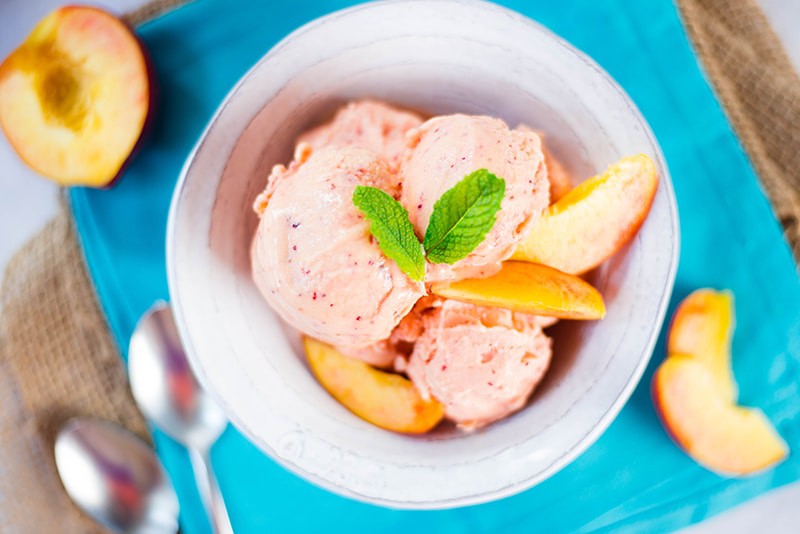
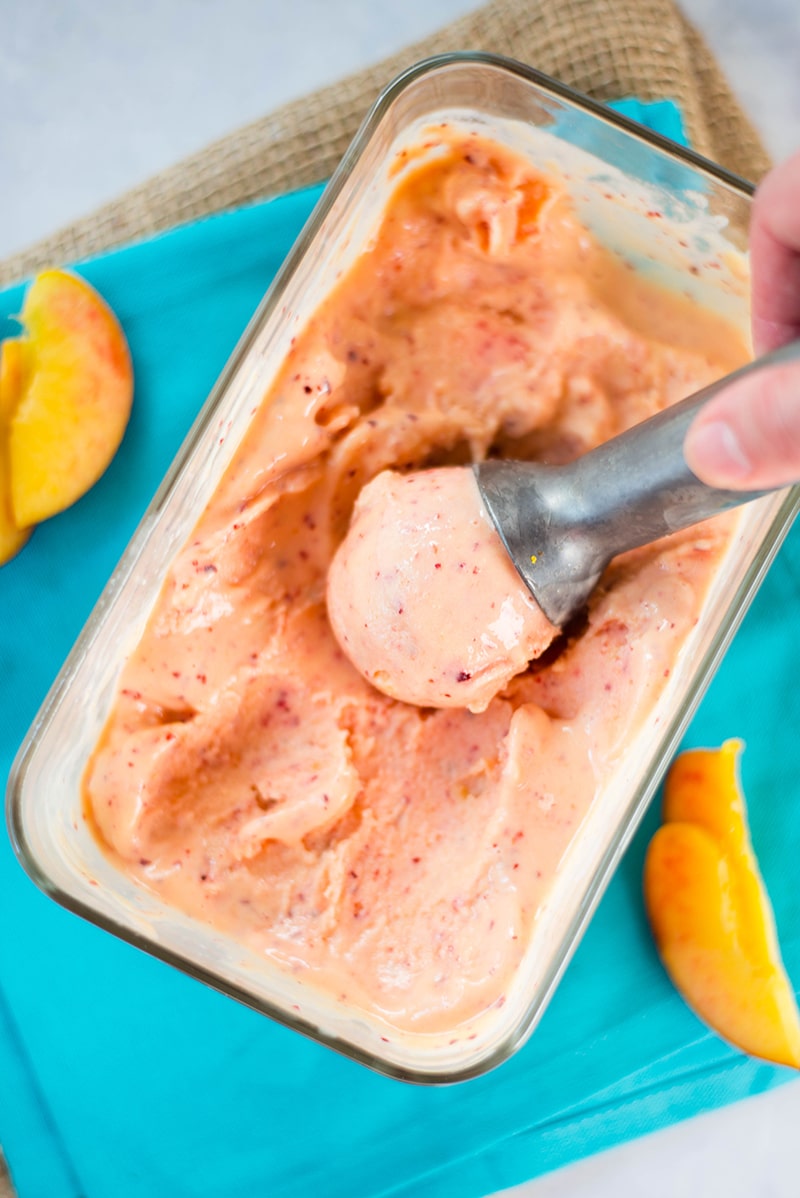
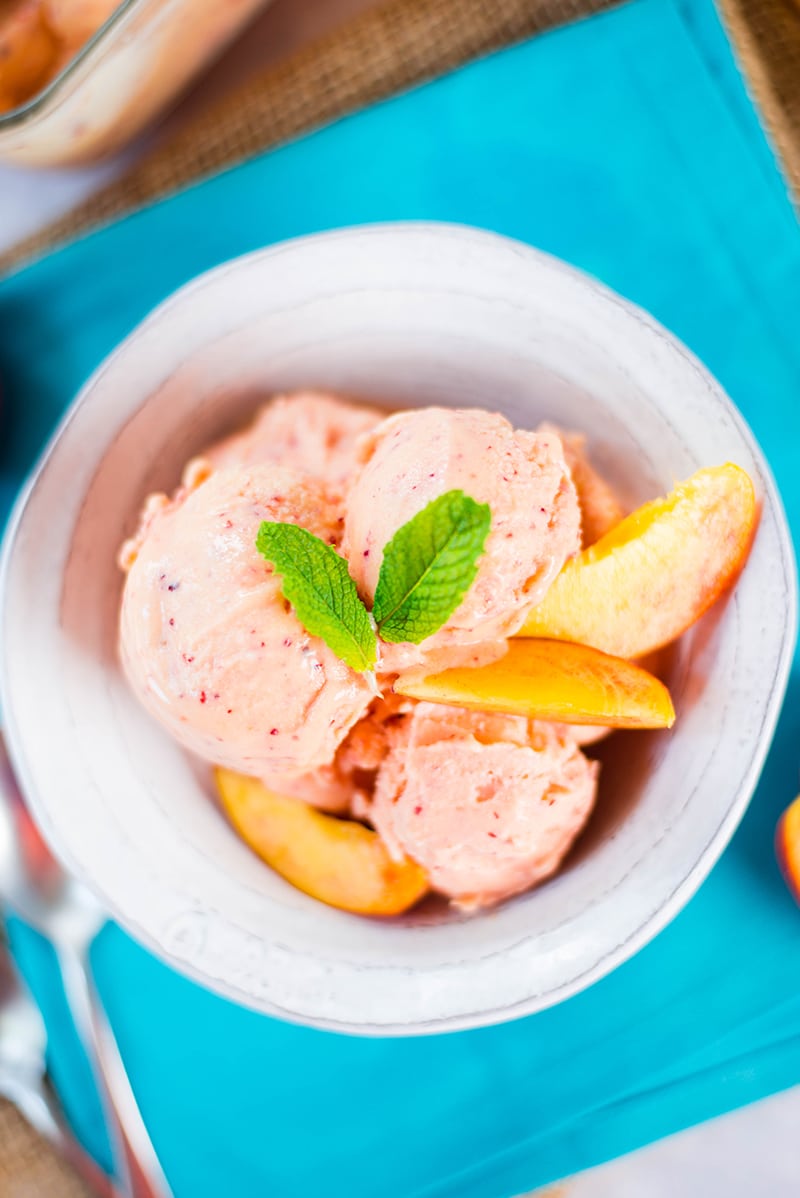
No ice cream maker required for this peach frozen yogurt recipe, made with only 4 ingredients!

As you may have noticed, I’ve been slowly going through many of my older posts on the blog and turning them into cleaner recipes – meaning they contain no refined sugars or refined flours. (For more info on how to start eating clean for beginners, click here!)
While many of my older recipes are super tasty and made from scratch, they just don’t jive with a healthy lifestyle (unless we’re talkin’ about cheat days…).
One of those older goodies is my fresh peach ice cream recipe.
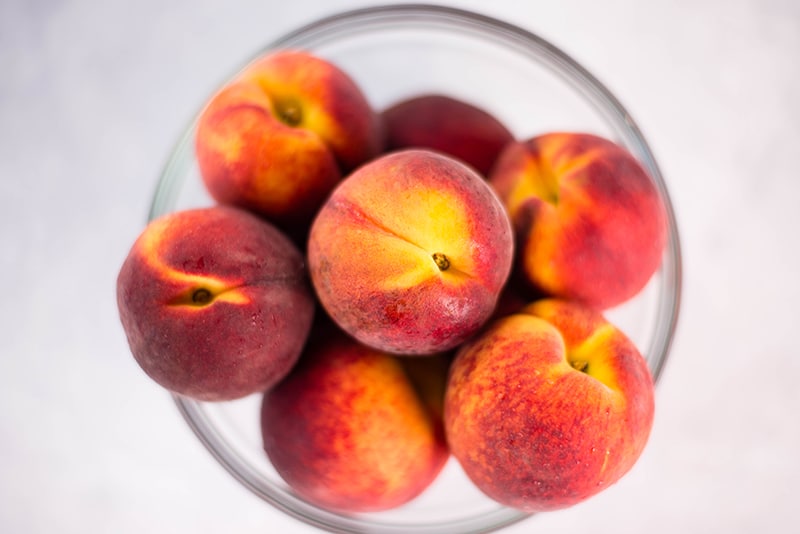
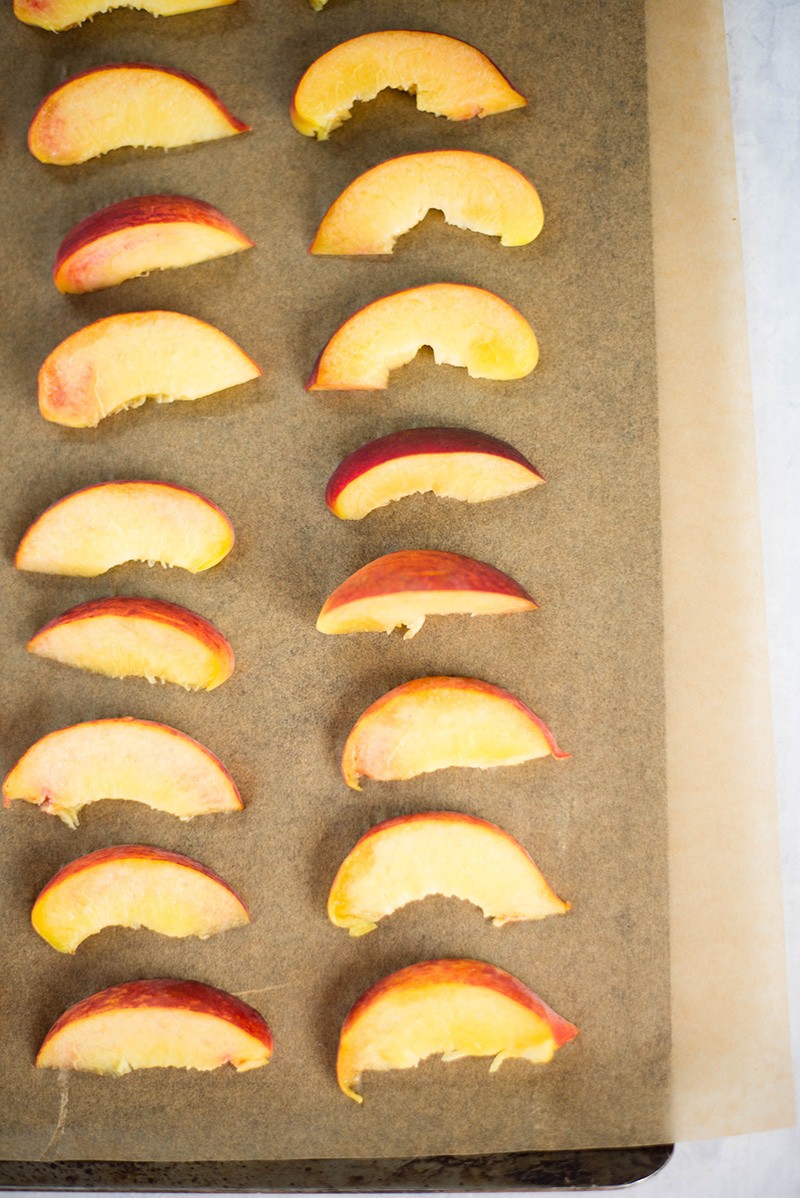
Since peaches are in season around here (and so, so very yummy!), I wanted to turn my peach ice cream recipe into a clean ice cream.
But, I also LOVE how delicious my 4 ingredient strawberry frozen yogurt turned out so I really wanted to learn how to make peach frozen yogurt.
Arg…decisions! Make a clean ice cream or frozen yogurt?
Ultimately, I decided to create a brand new fresh peach frozen yogurt recipe because it was just too dang good once I tested it out for myself. I also started thinking about the nutritional value of frozen yogurt vs. ice cream.
Is Frozen Yogurt Healthy?Is frozen yogurt better than ice cream? The reality is there are several types of ice creams and frozen yogurts, so if you want to eat more healthy, first pay attention to the actual ingredients and how the ice cream or frozen yogurt is made. When choosing between store-bought ice cream and frozen yogurt, check the labels of what you buy for added sugars and preservatives.
The best is to go for homemade ice cream or frozen yogurt, which can have a much higher nutritional value (like THIS peach frozen yogurt recipe). But, like most things in life, moderation is key. Eating smaller portions and avoiding unhealthy toppings is equally important to remember. Instead, add toppings like fresh peaches, bananas, strawberries, and blueberries to add color and flavor.
What makes this recipe so much healthier than other options is that it uses unsweetened greek yogurt and fresh peaches and just a touch of raw honey. All the ingredients are unprocessed and full of nutrients, fiber, and/or protein, making this frozen yogurt recipe way better for you than your typical ice cream.
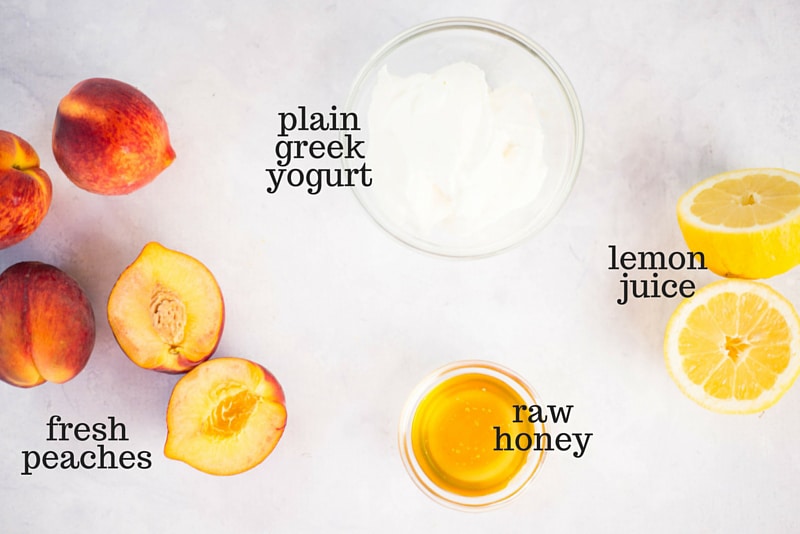
What Are the Ingredients in Frozen Yogurt with Peaches?This peach frozen yogurt recipe only needs 4 ingredients – yep FOUR! It’s unreal. If you have the following:
peaches raw honey plain Greek yogurt, and lemon juice…then, you’re good to GO. It’s that simple.
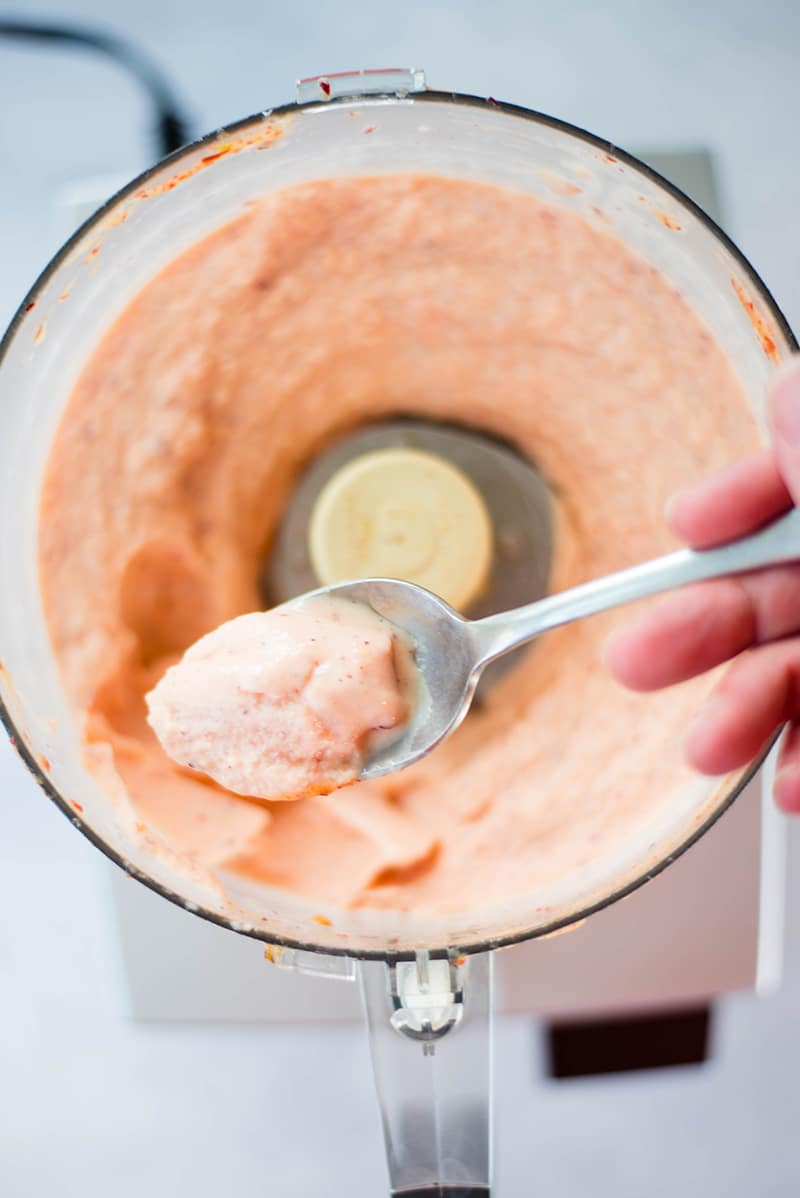
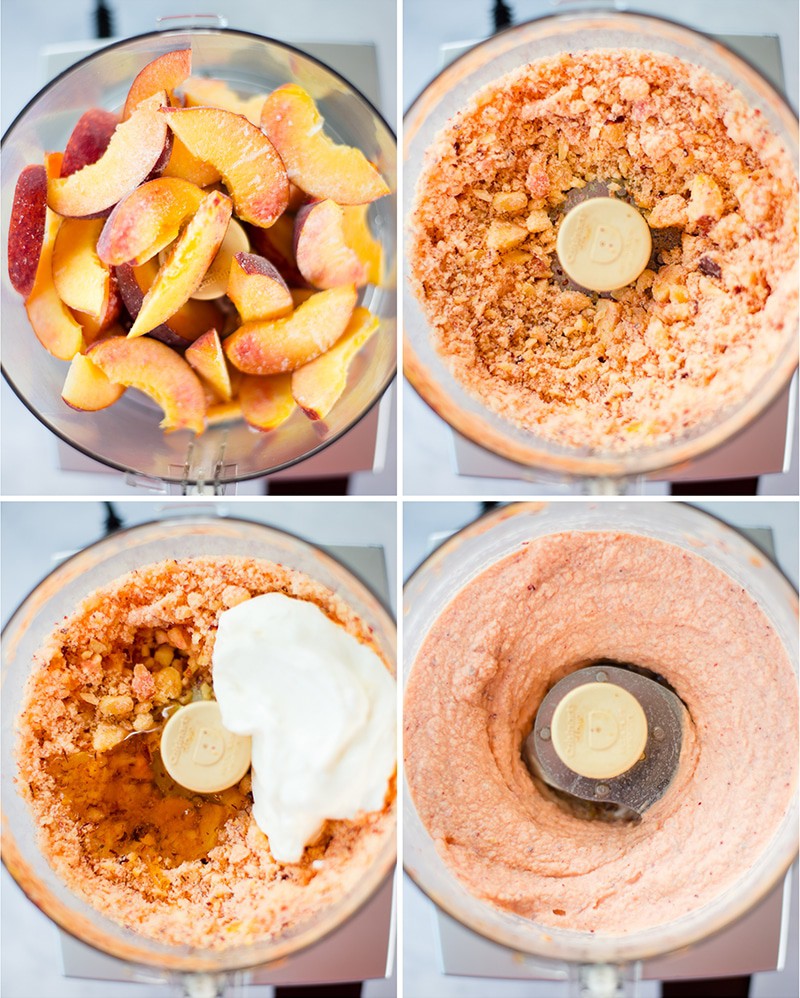
I also love how I can make this frozen yogurt without an ice cream maker – yes, ice cream makers are awesome…but so are food processors – plus it’s super quick!
At this point, you may be wondering, “Can you freeze regular yogurt?” or “Can you freeze Greek yogurt?” Well, the answer is yes, both regular and Greek yogurt can safely be frozen.
Doing so will make the yogurt last for up to 3 months. Plus, the health benefits will remain the same. The only thing to consider is freezing yogurt for more than a month may change its texture, giving it a slightly watered down consistency. I find it best to allow the frozen yogurt to slightly thaw for about 5 minutes and then stirring it up to regain the creamy texture of frozen yogurt.
How to Make Frozen YogurtMaking your own frozen yogurt is very easy to do and you don’t even need an ice cream maker to do it. Follow these easy steps for how to make frozen yogurt:
If you don’t have a food processor, you can blend all the ingredients together in a kitchen blender, then place into the freezer to freeze until mostly solid in an airtight, freezer-safe container. You could also add the blended mixture to an ice cream maker, if that is preferred.
If you’re looking for tasty, clean, and easy recipes that show you how to make how to make healthy frozen yogurt and ice creams, check out my:
Strawberry Frozen YogurtOne Ingredient Banana Ice CreamCantaloupe Sorbet4 Healthy & Easy Frozen Desserts for Summer4 Ingredient Matcha Frozen YogurtChocolate Banana Ice CreamAll delicious. All easy. All healthy.
This summer, I plan to make even more tasty and clean frozen yogurts and ice creams. What flavors would you like to see? Share them in the comments and I just might make your suggestion!

No ice cream maker required for this peach frozen yogurt recipe, made with only 4 ingredients!
This post contains affiliate links for products I use regularly and highly recommend.
The post Peach Frozen Yogurt appeared first on A Sweet Pea Chef.

The BEST healthy coleslaw made with fresh purple cabbage, carrots, cilantro, and a kick of heat from jalapeño. There’s no mayo, just a naturally sweet and slightly tangy dressing. This simple, healthy coleslaw is perfect serving with your favorite grilling recipes all summer! I don’t know about you, but I have a real addiction to [...]
The post Best Healthy Coleslaw Ever (no mayo!) appeared first on Ambitious Kitchen.
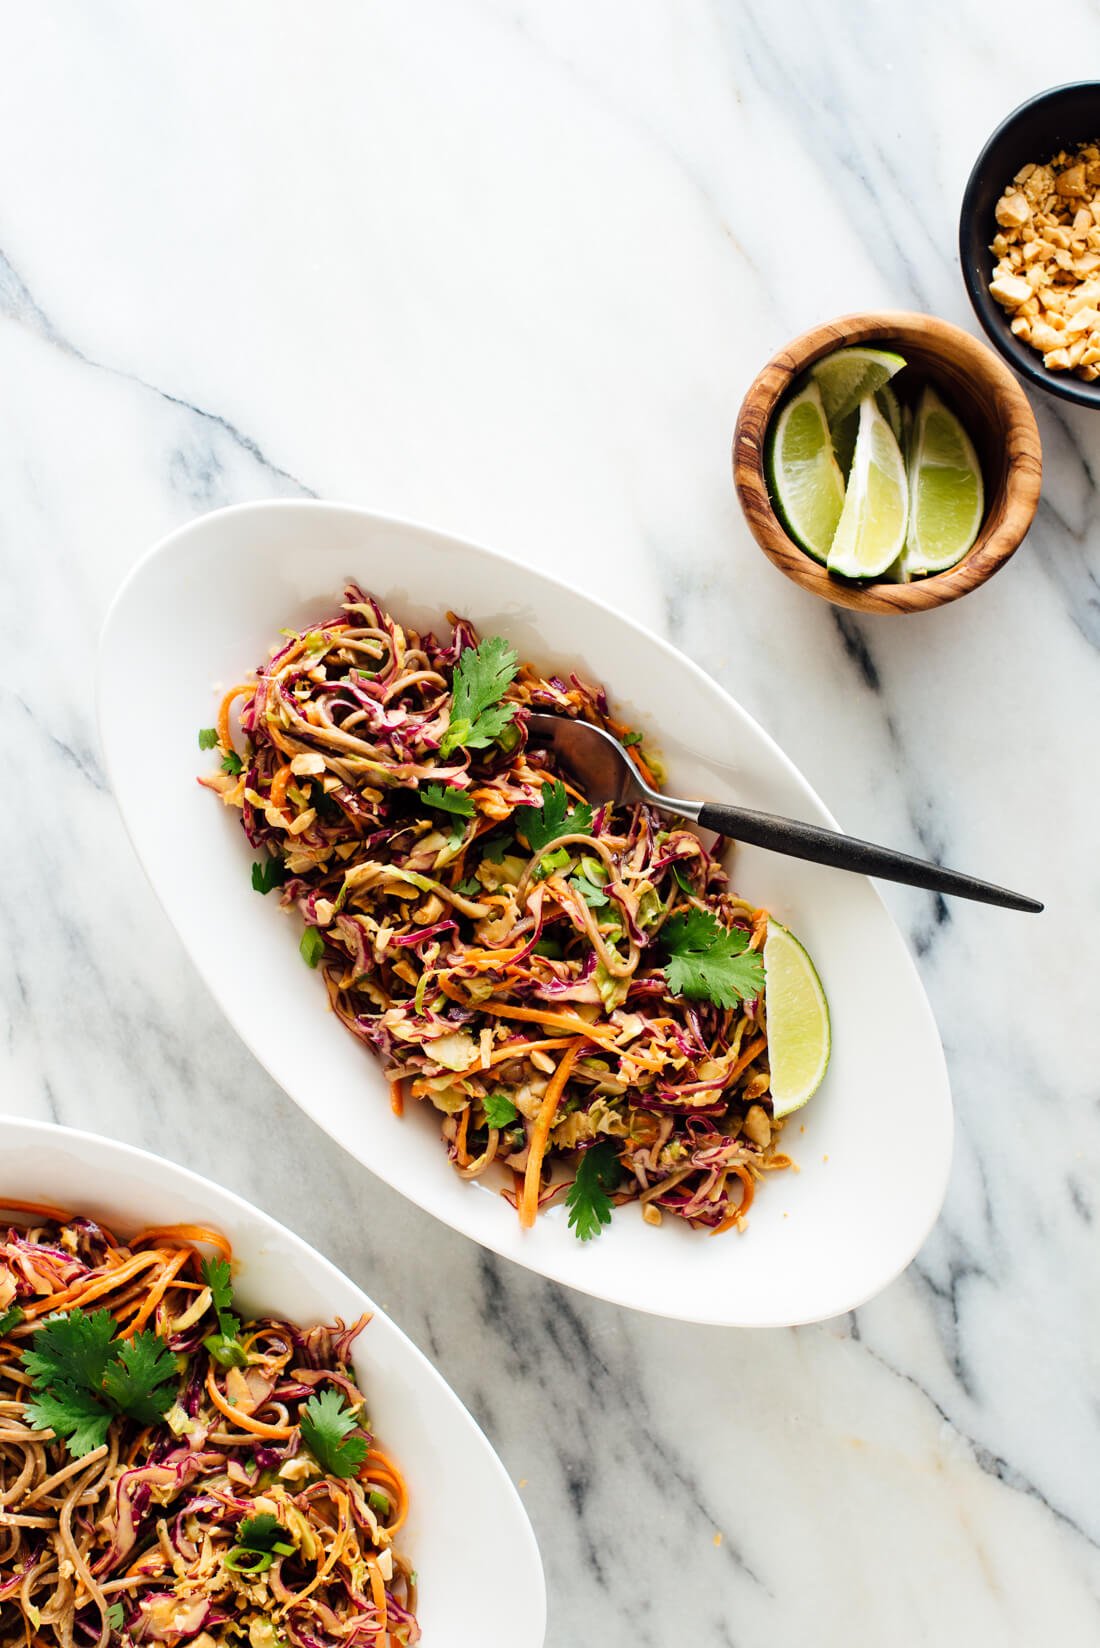
I’m re-introducing one of my all-time favorite recipes today! It’s a colorful slaw with tender soba noodles, tossed in sesame-ginger peanut sauce. Need I say more?
Ok, I’ll tell you more about it. It’s packed with nutritious vegetables, including carrots, cabbage and Brussels sprouts. This slaw is crunchy and satisfying, filling and full of flavor.
This recipe can satisfy your main-meal cravings (it packs great for lunch), or it can make a statement side dish. It’s easily made vegan and/or gluten free, making it an all-star potluck option.
This slaw is made with more vegetables than noodles, so it’s nice and light. I tend to get snacky when I’m feeling anxious or unsettled, so I’ve been taking a fork to this slaw in those moments. Chomp chomp chomp!
The post Peanut Slaw with Soba Noodles appeared first on Cookie and Kate.


Only 3 ingredients to make a deliciously sweet Okinawan treat called Sata Andagi. It’s a type of deep fried doughnut popular in Okinawa (and Hawaii) that is the winning combination of crispy and cakey!
During our short stay in Okinawa, we had a few chances to enjoy different flavors of Okinawan doughnuts, Sata Andagi (サーターアンダギー). Not only these doughnuts were on a list of must-eats when you visit, they are also known as an easy homemade snack in Okinawa. Since the idea of easy is always appealing, it had been on my mind to try my hand on these yummy doughnuts for a while.
Of all the various fun flavors, I decided to make Black Sugar Sata Andagi as my first. Relatively unrefined, black sugar is a common sugar in Okinawa and its deep malty, caramel-y characteristic enhances the flavor of the doughnuts tremendously.
(video)
Sata Andagi (サーターアンダギー or サーターアンダーギー) is a doughnut made with 3 ingredients – cake flour, sugar, and egg. The name comes from Okinawan word: sata means sugar and andagi means deep fried (food). The texture of sata andagi is very dense, and less airy and fluffy like the regular doughnuts.
When deep fried, the round balls crack with lines that resemble the smiley faces, which is why the doughnuts are considered good luck in Okinawa and are used for many happy occasions such as engagements and birthdays.
In Okinawa, where the weather is hot and humid, sata andagi keep well at room temperature for a few days. No wonder they have been enjoyed as homemade snacks for generations. If you visit Okinawa, the easiest place to spot sata andagi is at touristy places where you’ll see tiny kiosks selling these sweet treats. You can also find sata andagi specialty stores throughout Okinawa.
Many sata andagi shops carry similar flavors (shown in bold) but there are other delicious flavors that I didn’t get to try.
Sata Andagi has no fillings or fancy frosting. The ingredients are mixed in with the dough to make different flavors. Does any of the flavors above catch your attention?
If you haven’t made doughnuts before, you’d be happy to know that these Okinawan doughnuts are rather straight-forward. The only caveat is the deep frying, but since they were delicious in the way that deep fried dough is, it’s worth the effort. My family loves that they are not overly sweet, but more of a snacking doughnut, not a heavily glazed dessert doughnut that can bog you down easily. And yes, you can definitely eat them on a more regular basis. Okinawans say so! 
Don’t want to miss a recipe? Sign up for the FREE Just One Cookbook newsletter delivered to your inbox! And stay in touch with me on Facebook, Pinterest, and Instagram for all the latest updates.

In a large bowl, combine 1 large egg and 1/3 cup black sugar, and whisk together until sugar has dissolved.


Using a silicone spatula, start to combine the dry and wet ingredients. If the dough is too wet, you can add extra flour. Moisture in the air effects, so you have to decide how your dough is like. If you feel that it’s too soft and wet, add more flour 1 Tbsp at a time. The consistency is similar to cookie dough, but slightly softer. Let the dough rest for an hour.
Bring the oil to 300-320 ºF (150-160 ºC) over medium-low heat. In order to cook inside the dough, we deep fry at low temperature. For a medium saucepan, you will need about 3 cups oil. You can use less oil, but you will need to rotate the balls often as they won’t be covered by oil.
When the oil reaches 300-320 ºF (150-160 ºC), dip your fingers in the oil (for rolling the dough) and rub on your palms.
Scoop the dough with a cookie scooper and roll into a ball. To achieve same portion size for whatever you’re making, a cookie scooper is a great tool to have. The size should be slightly bigger than 1 inch (should be around 3 cm). We say the size should be Ping-Pong ball size (if that helps).

Once the dough balls are cooked through, they start to float. They rotate themselves, but you can help them rotate to achieve even coloring.

Recipe by Namiko Chen of Just One Cookbook. All images and content on this site are copyright protected. Please do not use my images without my permission. If you’d like to share this recipe on your site, please re-write the recipe in your own words and link to this post as the original source. Thank you.
The post Sata Andagi (Okinawan Doughnuts) サーターアンダギー appeared first on Just One Cookbook.


